
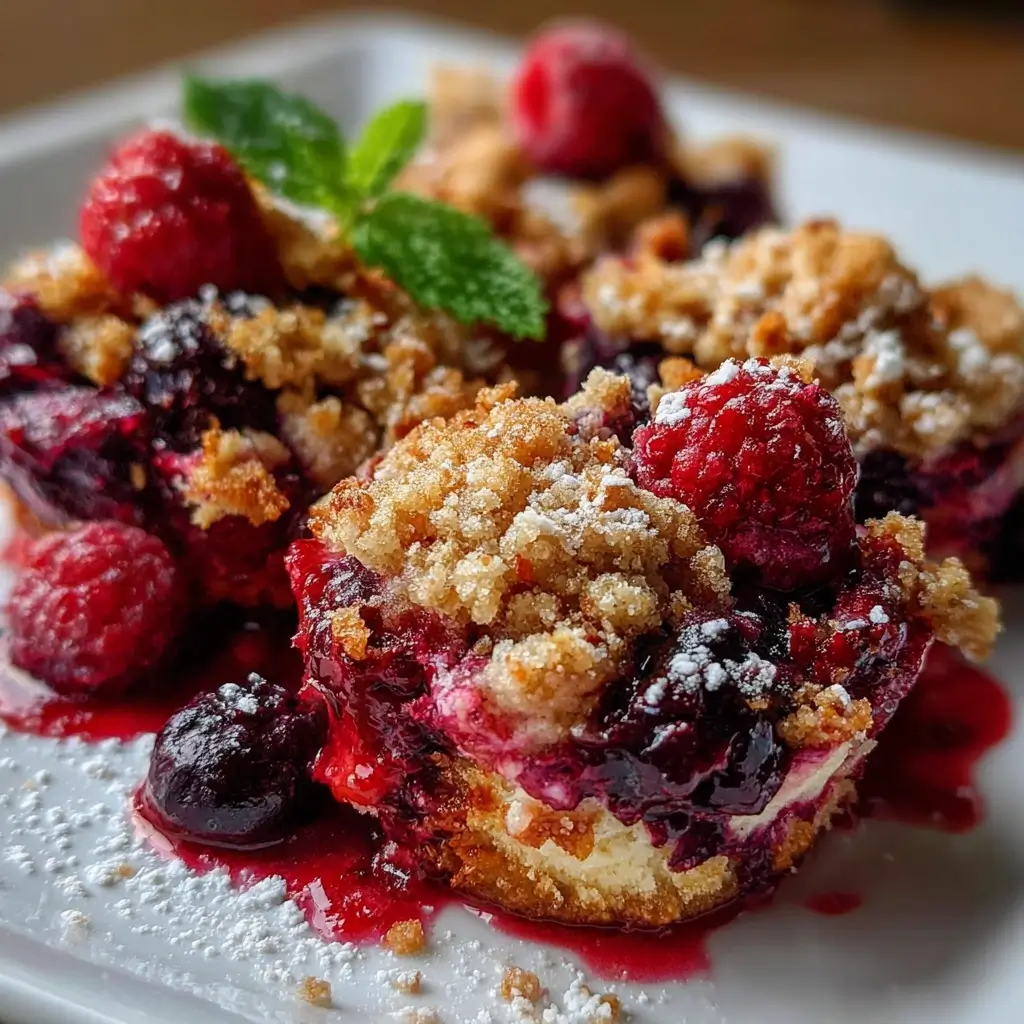
Of all the desserts I’ve created in my kitchen, few have captured the hearts of my family quite like these Whipped Berry Crumble Bites. It all started on a sweltering summer afternoon when I wanted to make something special for a last-minute family get-together. I had a classic berry crumble in mind, but the thought of a heavy, hot dessert felt wrong for the day. I wanted something light, refreshing, and easy to serve to a crowd mingling in the backyard. That’s when the idea struck: deconstruct the crumble. I decided to separate the key elements—the jammy berries, the buttery crumble, and a light-as-air whipped cream—and layer them into individual glasses. The result was nothing short of magical. The moment I brought them out, the conversation stopped. The vibrant layers of deep purple berry compote, pristine white cream, and golden-brown crumble were a feast for the eyes. My kids, who are usually my toughest critics, devoured them in minutes, their faces smeared with cream and berry juice. My husband, who typically prefers chocolate desserts, declared it his new favorite. What makes this recipe so special is the incredible contrast of textures and temperatures: the warm, jammy burst of berries against the cool, ethereal whipped cream, all punctuated by the satisfying, buttery crunch of the oat crumble. It’s a sophisticated dessert that feels incredibly comforting, a perfect end to any meal, from a casual BBQ to an elegant dinner party. These Whipped Berry Crumble Bites are now my go-to recipe for impressing guests with minimal stress, and I’m so excited to share the magic with you.
Ingredients
Here are the simple, wholesome ingredients you’ll need to create these delightful layered dessert bites. Each component plays a crucial role in building the perfect balance of flavor and texture.
For the Vibrant Berry Compote:
- 4 cups Mixed Berries (fresh or frozen): A combination of strawberries, blueberries, raspberries, and blackberries provides a wonderful depth of flavor, balancing sweet and tart notes. Using frozen berries is perfectly fine; there’s no need to thaw them first.
- ¼ cup Granulated Sugar: This sweetens the compote and helps the berries break down and release their juices. You can adjust the amount based on the natural sweetness of your berries.
- 1 tbsp Lemon Juice: Freshly squeezed lemon juice is essential. It brightens the flavor of the berries and prevents the compote from becoming overly sweet.
- 1 tbsp Cornstarch + 2 tbsp Water: This creates a “slurry” that acts as a thickening agent, ensuring your compote has a luscious, jammy consistency rather than being watery.
For the Buttery Crumble Topping:
- 1 cup All-Purpose Flour: This forms the structural base of our crumble, giving it a tender, biscuit-like quality.
- ¾ cup Rolled Oats (Old-Fashioned): Rolled oats provide a fantastic chewy texture and nutty flavor that defines a classic crumble. Avoid instant oats, as they can become mushy.
- ½ cup Light Brown Sugar, packed: Brown sugar adds a rich, molasses-like sweetness and helps the crumble become wonderfully crisp and caramelized during baking.
- ½ tsp Ground Cinnamon: A hint of cinnamon adds warmth and spice that beautifully complements the sweet berries and buttery oats.
- ¼ tsp Salt: A small amount of salt is crucial for balancing the sweetness and enhancing all the other flavors in the crumble.
- ½ cup Unsalted Butter, cold and cubed: Using cold butter is key. As it melts in the oven, it creates steam pockets, resulting in a light and crunchy crumble, not a greasy one.
For the Dreamy Whipped Cream Filling:
- 2 cups Heavy Whipping Cream, very cold: The high fat content of heavy cream is what allows it to be whipped into stable, fluffy peaks. It must be very cold to whip up properly.
- ¼ cup Powdered Sugar (Confectioners’ Sugar): Powdered sugar dissolves instantly into the cream without creating a grainy texture, providing a smooth sweetness.
- 1 tsp Vanilla Extract: A touch of pure vanilla extract elevates the flavor of the cream, adding a fragrant, aromatic quality that ties the whole dessert together.
Instructions
Follow these detailed steps to assemble your Whipped Berry Crumble Bites. The process is broken down into making each of the three components separately before layering them together for the grand finale.
Step 1: Create the Vibrant Berry Compote
- Combine Ingredients: In a medium saucepan, combine the mixed berries (fresh or frozen), granulated sugar, and lemon juice. Place the saucepan over medium heat.
- Cook the Berries: Stir the mixture occasionally as it heats up. The berries will begin to release their juices and break down. Bring the mixture to a gentle simmer. Let it cook for about 8-10 minutes, stirring periodically, until the fruit is soft and the sauce has started to thicken slightly. You can gently mash some of the berries with the back of your spoon to help the process along, but leave some whole for texture.
- Thicken the Compote: In a small bowl, whisk together the cornstarch and cold water until you have a smooth, milky slurry with no lumps. While stirring the berry mixture continuously, slowly pour in the cornstarch slurry.
- Final Cook: Continue to cook and stir for another 1-2 minutes. You will notice the compote thicken to a beautiful, glossy, jam-like consistency.
- Cool Down: Remove the saucepan from the heat and transfer the compote to a heatproof bowl. Let it cool completely to room temperature. You can speed this up by placing it in the refrigerator. A cooled compote will prevent the whipped cream from melting during assembly.
Step 2: Bake the Golden Crumble Topping
- Preheat and Prep: Preheat your oven to 375°F (190°C). Line a large baking sheet with parchment paper for easy cleanup.
- Combine Dry Ingredients: In a medium bowl, whisk together the all-purpose flour, rolled oats, packed light brown sugar, ground cinnamon, and salt. Make sure everything is evenly distributed.
- Cut in the Butter: Add the cold, cubed unsalted butter to the dry ingredients. Using a pastry blender, two knives, or your fingertips, cut the butter into the flour mixture. Work quickly to prevent the butter from warming up too much. Continue until the mixture resembles coarse crumbs with some pea-sized pieces of butter still visible. These larger butter pieces are what make the crumble extra flaky.
- Bake the Crumble: Spread the crumble mixture in an even layer on the prepared baking sheet. Bake for 12-15 minutes, or until it is golden brown and smells fragrant and toasty. Be sure to watch it closely in the last few minutes, as it can go from golden to burnt quickly.
- Cool Completely: Remove the baking sheet from the oven and let the crumble cool completely on the sheet. As it cools, it will become even more crisp and crunchy. Once cooled, you can break up any larger clumps with your hands.
Step 3: Whip Up the Dreamy Cream Filling
- Chill Your Equipment: For the best results, place your mixing bowl and the whisk attachment (or beaters) in the freezer for about 10-15 minutes before you begin. A cold bowl and beaters will help the cream whip up faster and achieve more volume.
- Start Whipping: Pour the very cold heavy whipping cream into the chilled mixing bowl. Using a stand mixer with a whisk attachment or a hand mixer, beat the cream on medium speed until it starts to thicken and soft peaks begin to form.
- Add Sweetness and Flavor: Once you have soft peaks (the peak slumps over when you lift the whisk), turn the mixer to low and gradually add the powdered sugar and vanilla extract.
- Whip to Stiff Peaks: Increase the mixer speed to medium-high and continue to beat until stiff peaks form. You’ll know you’ve reached this stage when the cream is thick, voluminous, and holds its shape completely when you lift the whisk out. Be careful not to over-whip, or the cream will start to turn into butter.
Step 4: Assemble Your Whipped Berry Crumble Bites
- Choose Your Vessels: Select your serving glasses. Small mason jars, clear tumblers, wine glasses, or ramekins all work beautifully for showcasing the distinct layers.
- First Layer – Crumble: Place a spoonful or two of the cooled crumble topping into the bottom of each glass. This provides a crunchy foundation.
- Second Layer – Whipped Cream: Carefully spoon or pipe a layer of the freshly whipped cream over the crumble. Using a piping bag can create a neater layer, but a spoon works just as well for a more rustic look.
- Third Layer – Berry Compote: Add a generous spoonful of the cooled berry compote over the whipped cream layer.
- Repeat the Layers: Continue layering in the same order—crumble, cream, compote—until you reach the top of your glass, finishing with a final flourish.
- Garnish and Serve: For the perfect finish, top each dessert bite with a final dollop of whipped cream, a generous sprinkle of the remaining crumble, and perhaps a fresh berry or a sprig of mint for a pop of color. Serve immediately for the best texture.
Nutrition Facts
- Servings: 10 individual bites
- Calories per serving: Approximately 380 kcal
This dessert is a treat, but it’s packed with some wonderful nutrients from its whole-food ingredients.
- Vitamin C: Abundant in the mixed berries, Vitamin C is a powerful antioxidant that supports immune function and skin health.
- Dietary Fiber: The rolled oats and berries provide a good source of fiber, which is essential for digestive health and helping you feel full and satisfied.
- Manganese: Found in both oats and berries, this essential mineral plays a role in bone formation, metabolism, and protecting cells from damage.
- Antioxidants: Berries are famously rich in antioxidants like anthocyanins (which give them their deep colors), helping to combat oxidative stress in the body.
- Healthy Fats: While this is an indulgent dessert, the heavy cream provides fats that are necessary for absorbing fat-soluble vitamins and providing sustained energy.
Preparation Time
This recipe is surprisingly quick to bring together, with most of the time spent cooling the components.
- Active Time: Approximately 25 minutes (10 minutes for the compote, 5 minutes to mix the crumble, 10 minutes to whip the cream and assemble).
- Baking/Cooking Time: Approximately 15-20 minutes.
- Cooling Time: Approximately 1 hour (this is crucial for the compote and crumble).
- Total Time: Approximately 1 hour and 45 minutes.
How to Serve
Presentation is key to making these simple bites feel extraordinary. Here are some creative ways to serve them for any occasion:
- Individual Glassware:
- Small Mason Jars: Perfect for a rustic, casual feel at picnics or backyard BBQs. You can even put the lids on for easy transport.
- Clear Tumblers or Old-Fashioned Glasses: These offer a clean, modern look that beautifully showcases the colorful layers.
- Stemless Wine Glasses: An elegant option for dinner parties, elevating the dessert to something truly special.
- Small Ramekins: A classic choice that works well, though you won’t see the layers from the side.
- Garnishing for a Finishing Touch:
- Extra Crumble: Always save a generous amount of crumble for a crunchy topping.
- Fresh Berries: A single perfect raspberry or a few small blueberries on top adds freshness and visual appeal.
- Mint Sprig: A sprig of fresh mint provides a beautiful pop of green and a hint of fresh aroma.
- Lemon Zest: A light grating of fresh lemon zest over the top can brighten the flavors even more.
- Dusting of Powdered Sugar: For a final touch of elegance, a light dusting of powdered sugar over the top looks like a sweet snowfall.
- Serving Temperature:
- For the best experience, assemble the bites just before serving. This maintains the ideal textural contrast: the cool cream, room-temperature (or slightly warm) compote, and crunchy crumble.
Additional Tips
Unlock the full potential of this recipe with these eight expert tips for customization, preparation, and perfection.
- Make-Ahead Magic: This dessert is perfect for entertaining because you can prepare all the components in advance. The berry compote can be made up to 3 days ahead and stored in an airtight container in the refrigerator. The crumble topping can be baked, cooled, and stored in an airtight container at room temperature for up to a week. The whipped cream is best made fresh, but you can whip it a few hours ahead and keep it covered in the fridge. Assemble right before serving.
- Go Gluten-Free with Ease: To make this recipe gluten-free, simply substitute the all-purpose flour with a good quality 1-to-1 gluten-free baking flour blend. Ensure your rolled oats are certified gluten-free to avoid any cross-contamination. The results are just as delicious and crunchy.
- Dairy-Free Delights: For a dairy-free or vegan version, this recipe adapts beautifully. Use a high-quality, firm vegan butter or solid coconut oil in place of the unsalted butter in the crumble. For the whipped filling, use a can of full-fat coconut cream that has been chilled in the refrigerator overnight. Scoop out the thick, solidified cream from the top of the can (discard the watery part) and whip it with powdered sugar and vanilla, just as you would with heavy cream.
- Play with Your Berries and Fruits: Don’t feel limited to a mixed berry blend. This recipe is fantastic with a single star berry, like a raspberry or blackberry compote. In the summer, try a peach or nectarine compote. In the fall, a spiced apple or pear compote would be sensational.
- Crumble Customization: Elevate your crumble topping by adding extra ingredients. A half-cup of chopped pecans, walnuts, or sliced almonds adds a wonderful nutty crunch. You can also experiment with spices; a pinch of cardamom or nutmeg alongside the cinnamon adds a complex, aromatic warmth.
- Control the Sweetness: The sweetness of berries can vary greatly. Taste your berries before you start. If they are very ripe and sweet, you may want to reduce the sugar in the compote slightly. If they are particularly tart, you might need a little extra. Don’t be afraid to taste and adjust.
- The Perfect Whip Every Time: The secret to stable, fluffy whipped cream is temperature. Everything must be cold. Use heavy whipping cream straight from the coldest part of your fridge, and always chill your bowl and beaters. This helps the fat globules in the cream emulsify properly, creating a strong structure that won’t deflate easily.
- Storage Savvy for Leftovers: If you have leftovers, they are best stored unassembled. Keep the components separate in airtight containers in the fridge. Once assembled, the crumble will start to soften from the moisture of the cream and compote. They will still taste delicious the next day, but you’ll lose that signature crunch. If you must store them assembled, cover them tightly and consume within 24 hours.
FAQ Section
Here are answers to some of the most common questions about making these Whipped Berry Crumble Bites.
1. Can I use frozen berries instead of fresh?
Absolutely! Frozen berries work wonderfully in the compote. There is no need to thaw them beforehand; simply add them to the saucepan frozen. You may need to cook them for a few extra minutes to account for the lower starting temperature, but the final result will be just as rich and delicious.
2. My compote is too runny. How can I fix it?
If your compote isn’t as thick as you’d like, the easiest fix is to make another small cornstarch slurry (e.g., 1 teaspoon of cornstarch mixed with 2 teaspoons of cold water). Bring the compote back to a simmer and slowly whisk in the new slurry, cooking for another minute until it thickens. Remember that the compote will also thicken considerably as it cools.
3. Can I make one large crumble dessert instead of individual bites?
Yes, you can easily adapt this recipe. To make a large, layered trifle-style dessert, simply use a large glass bowl or trifle dish. Layer the crumble, whipped cream, and berry compote in the same order, creating two or three full sets of layers. This makes for a stunning centerpiece dessert for a large gathering.
4. What’s the best way to store the crumble topping to keep it crunchy?
The key to a crunchy crumble is keeping it away from moisture. Once baked and completely cooled, store the crumble in a completely airtight container at room temperature. Do not refrigerate it, as the cool, humid air in the fridge can make it soft. Stored properly, it will stay perfectly crisp for up to a week.
5. Is this recipe suitable for kids to help with?
This is a fantastic recipe for getting kids involved in the kitchen! They can help with measuring dry ingredients, mashing the berries for the compote (with supervision), and mixing the crumble topping with their hands. Assembling the layers in the glasses is also a fun and creative task for little helpers.
6. Can I use a different sweetener instead of granulated sugar?
Certainly. In the compote, you can substitute maple syrup or honey for the granulated sugar for a different flavor profile; you may need to adjust the amount to your taste. In the crumble, coconut sugar is a great 1-to-1 substitute for brown sugar. For the whipped cream, it’s best to stick with powdered sugar for a smooth texture, but a powdered monk fruit or erythritol sweetener would also work for a lower-sugar option.
7. Why are my Whipped Berry Crumble Bites watery at the bottom?
This usually happens for one of two reasons. Either the berry compote was not cooled completely before layering, causing it to melt the whipped cream, or the compote itself wasn’t thick enough and its juices seeped down. Ensure your compote is fully at room temperature or chilled and has a thick, jammy consistency before you start assembling.
8. How long will these dessert bites last in the fridge once assembled?
Once assembled, the Whipped Berry Crumble Bites are best enjoyed within a few hours to experience the optimal texture contrast. However, they can be stored, covered, in the refrigerator for up to 24 hours. After that, the crumble will become soft, and the whipped cream may start to weep slightly, but they will still be tasty.

Whipped Berry Crumble Bites
Ingredients
Here are the simple, wholesome ingredients you’ll need to create these delightful layered dessert bites. Each component plays a crucial role in building the perfect balance of flavor and texture.
For the Vibrant Berry Compote:
- 4 cups Mixed Berries (fresh or frozen): A combination of strawberries, blueberries, raspberries, and blackberries provides a wonderful depth of flavor, balancing sweet and tart notes. Using frozen berries is perfectly fine; there’s no need to thaw them first.
- ¼ cup Granulated Sugar: This sweetens the compote and helps the berries break down and release their juices. You can adjust the amount based on the natural sweetness of your berries.
- 1 tbsp Lemon Juice: Freshly squeezed lemon juice is essential. It brightens the flavor of the berries and prevents the compote from becoming overly sweet.
- 1 tbsp Cornstarch + 2 tbsp Water: This creates a “slurry” that acts as a thickening agent, ensuring your compote has a luscious, jammy consistency rather than being watery.
For the Buttery Crumble Topping:
- 1 cup All-Purpose Flour: This forms the structural base of our crumble, giving it a tender, biscuit-like quality.
- ¾ cup Rolled Oats (Old-Fashioned): Rolled oats provide a fantastic chewy texture and nutty flavor that defines a classic crumble. Avoid instant oats, as they can become mushy.
- ½ cup Light Brown Sugar, packed: Brown sugar adds a rich, molasses-like sweetness and helps the crumble become wonderfully crisp and caramelized during baking.
- ½ tsp Ground Cinnamon: A hint of cinnamon adds warmth and spice that beautifully complements the sweet berries and buttery oats.
- ¼ tsp Salt: A small amount of salt is crucial for balancing the sweetness and enhancing all the other flavors in the crumble.
- ½ cup Unsalted Butter, cold and cubed: Using cold butter is key. As it melts in the oven, it creates steam pockets, resulting in a light and crunchy crumble, not a greasy one.
For the Dreamy Whipped Cream Filling:
- 2 cups Heavy Whipping Cream, very cold: The high fat content of heavy cream is what allows it to be whipped into stable, fluffy peaks. It must be very cold to whip up properly.
- ¼ cup Powdered Sugar (Confectioners’ Sugar): Powdered sugar dissolves instantly into the cream without creating a grainy texture, providing a smooth sweetness.
- 1 tsp Vanilla Extract: A touch of pure vanilla extract elevates the flavor of the cream, adding a fragrant, aromatic quality that ties the whole dessert together.
Instructions
Follow these detailed steps to assemble your Whipped Berry Crumble Bites. The process is broken down into making each of the three components separately before layering them together for the grand finale.
Step 1: Create the Vibrant Berry Compote
- Combine Ingredients: In a medium saucepan, combine the mixed berries (fresh or frozen), granulated sugar, and lemon juice. Place the saucepan over medium heat.
- Cook the Berries: Stir the mixture occasionally as it heats up. The berries will begin to release their juices and break down. Bring the mixture to a gentle simmer. Let it cook for about 8-10 minutes, stirring periodically, until the fruit is soft and the sauce has started to thicken slightly. You can gently mash some of the berries with the back of your spoon to help the process along, but leave some whole for texture.
- Thicken the Compote: In a small bowl, whisk together the cornstarch and cold water until you have a smooth, milky slurry with no lumps. While stirring the berry mixture continuously, slowly pour in the cornstarch slurry.
- Final Cook: Continue to cook and stir for another 1-2 minutes. You will notice the compote thicken to a beautiful, glossy, jam-like consistency.
- Cool Down: Remove the saucepan from the heat and transfer the compote to a heatproof bowl. Let it cool completely to room temperature. You can speed this up by placing it in the refrigerator. A cooled compote will prevent the whipped cream from melting during assembly.
Step 2: Bake the Golden Crumble Topping
- Preheat and Prep: Preheat your oven to 375°F (190°C). Line a large baking sheet with parchment paper for easy cleanup.
- Combine Dry Ingredients: In a medium bowl, whisk together the all-purpose flour, rolled oats, packed light brown sugar, ground cinnamon, and salt. Make sure everything is evenly distributed.
- Cut in the Butter: Add the cold, cubed unsalted butter to the dry ingredients. Using a pastry blender, two knives, or your fingertips, cut the butter into the flour mixture. Work quickly to prevent the butter from warming up too much. Continue until the mixture resembles coarse crumbs with some pea-sized pieces of butter still visible. These larger butter pieces are what make the crumble extra flaky.
- Bake the Crumble: Spread the crumble mixture in an even layer on the prepared baking sheet. Bake for 12-15 minutes, or until it is golden brown and smells fragrant and toasty. Be sure to watch it closely in the last few minutes, as it can go from golden to burnt quickly.
- Cool Completely: Remove the baking sheet from the oven and let the crumble cool completely on the sheet. As it cools, it will become even more crisp and crunchy. Once cooled, you can break up any larger clumps with your hands.
Step 3: Whip Up the Dreamy Cream Filling
- Chill Your Equipment: For the best results, place your mixing bowl and the whisk attachment (or beaters) in the freezer for about 10-15 minutes before you begin. A cold bowl and beaters will help the cream whip up faster and achieve more volume.
- Start Whipping: Pour the very cold heavy whipping cream into the chilled mixing bowl. Using a stand mixer with a whisk attachment or a hand mixer, beat the cream on medium speed until it starts to thicken and soft peaks begin to form.
- Add Sweetness and Flavor: Once you have soft peaks (the peak slumps over when you lift the whisk), turn the mixer to low and gradually add the powdered sugar and vanilla extract.
- Whip to Stiff Peaks: Increase the mixer speed to medium-high and continue to beat until stiff peaks form. You’ll know you’ve reached this stage when the cream is thick, voluminous, and holds its shape completely when you lift the whisk out. Be careful not to over-whip, or the cream will start to turn into butter.
Step 4: Assemble Your Whipped Berry Crumble Bites
- Choose Your Vessels: Select your serving glasses. Small mason jars, clear tumblers, wine glasses, or ramekins all work beautifully for showcasing the distinct layers.
- First Layer – Crumble: Place a spoonful or two of the cooled crumble topping into the bottom of each glass. This provides a crunchy foundation.
- Second Layer – Whipped Cream: Carefully spoon or pipe a layer of the freshly whipped cream over the crumble. Using a piping bag can create a neater layer, but a spoon works just as well for a more rustic look.
- Third Layer – Berry Compote: Add a generous spoonful of the cooled berry compote over the whipped cream layer.
- Repeat the Layers: Continue layering in the same order—crumble, cream, compote—until you reach the top of your glass, finishing with a final flourish.
- Garnish and Serve: For the perfect finish, top each dessert bite with a final dollop of whipped cream, a generous sprinkle of the remaining crumble, and perhaps a fresh berry or a sprig of mint for a pop of color. Serve immediately for the best texture.
Nutrition
- Serving Size: one normal portion
- Calories: 380