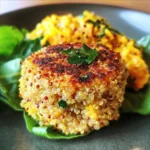

It’s a familiar story in our household – that weeknight scramble for something quick, nutritious, and, most importantly, something everyone will actually eat without complaint. For the longest time, I struggled to find that perfect balance, especially on busy evenings. Then, I stumbled upon the magic of these Speedy Tuna Quinoa Cakes. The first time I made them, the kids were skeptical (tuna and quinoa?), but one bite in, and they were hooked! My husband, who usually craves heartier meals, was equally impressed by how satisfying and flavorful they were. They’ve since become a non-negotiable staple in our meal rotation, a testament to their delicious simplicity and crowd-pleasing nature. These little powerhouses are packed with protein, wholesome grains, and a surprising burst of flavor that belies their quick preparation time. They’re crispy on the outside, tender on the inside, and incredibly versatile. Whether served as a light lunch, a satisfying dinner, or even as party appetizers, these Speedy Tuna Quinoa Cakes always hit the spot. I’ve tweaked and perfected this recipe over time, and I’m thrilled to share my go-to version with you. Get ready to add a new favorite to your recipe repertoire!
Ingredients for Speedy Tuna Quinoa Cakes
To whip up these delightful Speedy Tuna Quinoa Cakes, you’ll need a handful of pantry staples and fresh ingredients that come together beautifully. Each component plays a crucial role in achieving the perfect texture and taste.
- 2 cans (5 oz each) tuna in water or oil, drained very well: The star protein, ensure it’s thoroughly drained to prevent soggy cakes. Using tuna packed in water is a leaner option, while oil-packed tuna can add a bit more richness.
- 1 cup cooked quinoa, cooled: This ancient grain adds a wonderful nutty flavor, a slightly chewy texture, and a boost of complete protein and fiber. Ensure it’s cooled to help the cakes bind better.
- 1/2 cup breadcrumbs (panko preferred for extra crispiness, or regular): Acts as a binder and helps create that desirable crispy exterior. Panko breadcrumbs are lighter and airier, resulting in a superior crunch.
- 1/4 cup finely chopped red onion (or shallots): Adds a mild, slightly sharp flavor and a bit of texture. Shallots can be used for a more delicate oniony taste.
- 2 tablespoons chopped fresh parsley (or 1 tablespoon dried): Brings a fresh, herbaceous note that brightens the flavor profile. Fresh is always best, but dried works in a pinch.
- 1 tablespoon Dijon mustard: Adds a tangy depth of flavor and helps bind the ingredients. Its emulsifying properties are key.
- 1 large egg, lightly beaten: The primary binder that holds the cakes together.
- 1 tablespoon lemon juice, freshly squeezed: Cuts through the richness and adds a zesty brightness.
- 1/2 teaspoon garlic powder (or 1 clove fresh garlic, minced): Provides a savory, aromatic kick.
- Salt and freshly ground black pepper to taste: Essential for seasoning and enhancing all the other flavors.
- 2-3 tablespoons olive oil or avocado oil, for frying: For pan-frying the cakes to golden, crispy perfection. Choose an oil with a suitable smoke point.
Step-by-Step Instructions to Craft Your Cakes
Follow these simple steps to create your batch of Speedy Tuna Quinoa Cakes. The process is straightforward and rewards you with delicious results in no time.
- Prepare the Quinoa (if not already cooked): If you don’t have leftover cooked quinoa, cook 1/2 cup of dry quinoa according to package directions (usually 1/2 cup dry quinoa to 1 cup water or broth, bring to a boil, then simmer covered for 15 minutes, and let stand covered for 5 minutes. Fluff with a fork). Allow it to cool completely. This is crucial as warm quinoa can make the mixture too moist and difficult to form.
- Combine Wet and Dry Ingredients: In a large mixing bowl, add the thoroughly drained tuna. Use a fork to flake it apart. Add the cooled cooked quinoa, breadcrumbs, finely chopped red onion, fresh parsley, Dijon mustard, lightly beaten egg, fresh lemon juice, and garlic powder.
- Season Generously: Season the mixture with salt and freshly ground black pepper to your taste. Remember that tuna and quinoa are relatively bland on their own, so don’t be shy with the seasoning. Mix everything together gently but thoroughly until just combined. Be careful not to overmix, as this can make the cakes tough.
- Chill the Mixture (Optional but Recommended): For firmer cakes that are easier to handle and less likely to fall apart during cooking, cover the bowl and refrigerate the mixture for at least 15-20 minutes. This allows the breadcrumbs to absorb excess moisture and the flavors to meld.
- Form the Patties: Once chilled (or if you’re skipping the chilling step), take about 1/4 cup of the mixture and form it into a patty, about 1/2-inch thick and 2-3 inches in diameter. You should get about 8-10 patties, depending on their size. If the mixture is too sticky, lightly wet your hands.
- Cook the Tuna Quinoa Cakes: Heat the olive oil or avocado oil in a large non-stick skillet or frying pan over medium heat. The oil should be hot but not smoking.
- Pan-Fry to Perfection: Carefully place the patties in the hot skillet, ensuring not to overcrowd the pan (cook in batches if necessary). Cook for about 3-4 minutes per side, or until they are beautifully golden brown and crispy, and heated through.
- Drain Excess Oil: Once cooked, transfer the tuna quinoa cakes to a plate lined with paper towels to absorb any excess oil.
- Serve and Enjoy: Serve your Speedy Tuna Quinoa Cakes warm with your favorite accompaniments.
Nutrition Facts (Approximate)
These Speedy Tuna Quinoa Cakes are not only delicious but also pack a decent nutritional punch. Here’s an approximate breakdown:
- Servings: This recipe yields approximately 4 servings (2-3 cakes per serving, depending on size).
- Calories per serving: Approximately 300-350 calories (this can vary based on the type of tuna used – oil vs. water – and the amount of oil used for frying).
- Protein (approx. 25-30g per serving): A fantastic source of lean protein from both the tuna and quinoa, crucial for muscle repair, satiety, and overall bodily functions.
- Fiber (approx. 3-4g per serving): Primarily from the quinoa and vegetables, fiber aids in digestion, helps regulate blood sugar levels, and contributes to a feeling of fullness.
- Omega-3 Fatty Acids (varies): Tuna is a good source of these heart-healthy fats, which are beneficial for brain health and reducing inflammation. The amount varies depending on the type of tuna.
- Complex Carbohydrates (approx. 20-25g per serving): Quinoa provides sustained energy release thanks to its complex carbohydrate profile, unlike simple carbs that can cause energy crashes.
- Low Saturated Fat (if using water-packed tuna): When prepared with water-packed tuna and minimal frying oil, these cakes can be a relatively low saturated fat option.
Disclaimer: Nutritional information is an estimate and can vary based on specific ingredients and preparation methods used.
Preparation Time
One of the best things about these Speedy Tuna Quinoa Cakes is how quickly they come together, making them ideal for busy schedules.
- Prep Time: Approximately 15-20 minutes (this includes chopping vegetables and mixing ingredients, assuming quinoa is already cooked). If you need to cook quinoa from scratch, add an extra 20-25 minutes (though much of this is hands-off simmering time).
- Chill Time (Optional): 15-20 minutes.
- Cook Time: Approximately 8-10 minutes per batch (4-5 minutes per side). If cooking in two batches, this would be around 16-20 minutes.
- Total Time (without chilling, with pre-cooked quinoa): Roughly 25-30 minutes.
- Total Time (with chilling, with pre-cooked quinoa): Roughly 40-50 minutes.
These Speedy Tuna Quinoa Cakes truly live up to their name, offering a gourmet-tasting meal without spending hours in the kitchen.
How to Serve Your Speedy Tuna Quinoa Cakes
The versatility of these Speedy Tuna Quinoa Cakes means they can be served in numerous delightful ways. Here are some ideas to inspire you:
- As a Main Course:
- Serve 2-3 cakes per person alongside a fresh green salad with a light vinaigrette.
- Pair with steamed or roasted vegetables like asparagus, broccoli, or green beans for a complete, healthy meal.
- Accompany with a side of sweet potato fries or roasted potatoes.
- In a Sandwich or Burger:
- Place a cake (or two) in a whole-wheat bun or between slices of toasted artisan bread.
- Add lettuce, tomato, onion, and your favorite sauce (tartar sauce, aioli, or a spicy mayo work wonderfully).
- On Top of Salads:
- Crumble a cake or place it whole on top of a hearty mixed greens salad, Caesar salad, or a Greek salad for an extra protein boost.
- As Appetizers or Snacks:
- Make smaller, bite-sized patties and serve them with a dipping sauce.
- Great options include:
- Lemon-dill yogurt sauce
- Spicy Sriracha mayonnaise
- Classic tartar sauce
- Sweet chili sauce
- Garlic aioli
- In a Wrap or Pita:
- Tuck a couple of cakes into a warm pita bread or a tortilla wrap with shredded lettuce, chopped tomatoes, cucumbers, and a drizzle of tahini or tzatziki sauce.
- With Grains or Pasta:
- Serve alongside a simple lemon-herb couscous or a light tomato-based pasta.
- For Brunch:
- Top a cake with a poached egg and a dollop of hollandaise sauce for a creative take on Eggs Benedict.
Experiment with different pairings to find your favorite way to enjoy these adaptable and delicious Speedy Tuna Quinoa Cakes!
Additional Tips for Perfect Tuna Quinoa Cakes
To ensure your Speedy Tuna Quinoa Cakes turn out perfectly every time and to explore some fun variations, consider these helpful tips:
- Drain Tuna Thoroughly: This is paramount. Excess moisture from the tuna is the primary culprit for cakes that fall apart. Press the tuna firmly in a colander or use a can lid to squeeze out as much liquid as possible.
- Cool Quinoa Completely: Hot or even warm quinoa will make the mixture too soft and sticky, making it difficult to form patties that hold their shape. Spread it on a baking sheet to cool faster if you’re short on time.
- Don’t Overmix: Mix the ingredients until just combined. Overmixing can develop the gluten in any flour present (if you use regular breadcrumbs that aren’t gluten-free) and can make the egg proteins tough, resulting in dense, chewy cakes rather than light and tender ones.
- Embrace Variations:
- Spice it Up: Add a pinch of red pepper flakes, a dash of hot sauce, or some finely chopped jalapeño to the mixture for a spicy kick.
- Herb Power: Experiment with other fresh herbs like dill, chives, or cilantro instead of, or in addition to, parsley.
- Cheesy Goodness: Mix in 1/4 cup of grated Parmesan, cheddar, or feta cheese for an extra savory dimension.
- Veggie Boost: Add finely grated carrots or zucchini (squeeze out excess moisture) for added nutrients and moisture.
- Gluten-Free Option: Ensure your breadcrumbs are certified gluten-free (panko often has a GF version). Quinoa is naturally gluten-free. Alternatively, you can use almond flour or crushed gluten-free crackers as a binder.
- Baking Instead of Frying: For a healthier, lower-fat option, you can bake the tuna quinoa cakes. Preheat your oven to 400°F (200°C). Place the patties on a lightly oiled baking sheet or one lined with parchment paper. Lightly spray the tops of the cakes with cooking spray. Bake for 15-20 minutes, flipping halfway through, until golden brown and firm. They won’t be quite as crispy as pan-fried, but still delicious.
- Make-Ahead & Storage:
- The uncooked mixture can be prepared, covered, and refrigerated for up to 24 hours. Form patties just before cooking.
- Cooked tuna quinoa cakes can be stored in an airtight container in the refrigerator for up to 3-4 days. Reheat in a skillet, oven, or air fryer to maintain crispiness.
- Freezing: Cooked cakes freeze well. Let them cool completely, then arrange them in a single layer on a baking sheet to flash freeze. Once solid, transfer to a freezer-safe bag or container for up to 2-3 months. Thaw in the refrigerator and reheat.
- Ensure Oil is Hot Enough: Before adding the patties to the skillet, make sure the oil is sufficiently hot. A good test is to flick a tiny bit of water into the pan; if it sizzles immediately, the oil is ready. If the oil isn’t hot enough, the cakes will absorb too much oil and become greasy rather than crispy. Conversely, if it’s too hot, the outside will burn before the inside is heated through. Medium heat is usually perfect.
FAQ: Your Speedy Tuna Quinoa Cakes Questions Answered
Here are answers to some frequently asked questions about making Speedy Tuna Quinoa Cakes, helping you troubleshoot and perfect your batch.
- Q: Why are my tuna quinoa cakes falling apart?
A: This is usually due to excess moisture or not enough binder. Ensure you’ve drained the tuna very well. Also, make sure your cooked quinoa is completely cooled. If the mixture still seems too wet, try adding a tablespoon or two more of breadcrumbs. Chilling the mixture for at least 15-20 minutes before forming patties can also significantly help them hold their shape. - Q: Can I use canned salmon instead of tuna?
A: Absolutely! Canned salmon (drained well) is an excellent substitute and will provide a different but equally delicious flavor profile, along with a good dose of omega-3s. The recipe instructions would remain the same. - Q: What can I use instead of breadcrumbs for a gluten-free version?
A: For a gluten-free option, you can use certified gluten-free breadcrumbs (panko style is great if available). Alternatively, almond flour, crushed gluten-free crackers or oats (pulsed in a food processor to a coarse meal), or even a bit of coconut flour (use sparingly as it’s very absorbent) can work as binders. - Q: Can I make these tuna quinoa cakes in an air fryer?
A: Yes, an air fryer is a fantastic way to cook these! Preheat your air fryer to around 375°F (190°C). Lightly spray the basket and the tops of the cakes with oil. Air fry for 8-12 minutes, flipping halfway, until golden and crispy. Cooking time may vary depending on your air fryer model and cake thickness. - Q: How do I know when the tuna quinoa cakes are cooked through?
A: Since most of the ingredients (tuna, cooked quinoa) are already cooked, you’re primarily looking for the egg to set and the cakes to become golden brown and crispy on the outside. This usually takes about 3-4 minutes per side when pan-frying over medium heat. They should feel firm to the touch. - Q: My mixture seems too dry. What can I do?
A: If the mixture is too crumbly and not holding together, it might be too dry. This can happen if your quinoa was particularly dry or if you used very absorbent breadcrumbs. Try adding a teaspoon more of lemon juice or even a tablespoon of mayonnaise or plain yogurt to add a bit of moisture and help it bind. - Q: Can I add other vegetables to the cakes?
A: Yes, definitely! Finely chopped bell peppers (any color), grated carrots (squeeze out excess moisture), finely chopped celery, or corn kernels can be great additions. Just be mindful not to add too much bulk, as it might affect the cakes’ ability to hold together. Ensure any added vegetables are finely chopped or grated. - Q: What’s the best way to reheat leftover tuna quinoa cakes to keep them crispy?
A: The best way to reheat them and retain crispiness is in a skillet over medium heat with a tiny bit of oil for a few minutes per side. Alternatively, you can use an oven or toaster oven preheated to 350°F (175°C) for about 5-10 minutes, or an air fryer for 3-5 minutes. Microwaving will work in a pinch but will likely make them soft rather than crispy.