I still remember the first time I truly got hummus. It wasn’t the bland, pasty stuff sometimes found in supermarket tubs. It was at a small Mediterranean cafe, incredibly smooth, tangy, and singing with flavor. But the real game-changer? That was discovering roasted garlic hummus. Roasting transforms garlic from sharp and pungent into something mellow, sweet, and deeply savory. When I first tried making it at home, adding that caramelized garlic goodness to the creamy chickpea base, it was a revelation. My family devoured the entire batch in one sitting, dipping everything from pita bread to carrot sticks with gusto. It instantly became a staple for gatherings, movie nights, and even just a healthy afternoon snack. This recipe isn’t just about making dip; it’s about creating a bowl of pure comfort and flavor that brings people together. The aroma of garlic roasting in the oven alone is worth the (minimal) effort, promising the deliciousness to come. Trust me, once you try this homemade version, you’ll never look back.
Ingredients
Here’s what you’ll need to create this incredibly flavorful and creamy Roasted Garlic Hummus:
- Garlic: 1 whole head – The star of the show, roasting mellows its flavor to sweet perfection.
- Olive Oil: 3 tablespoons, divided (plus more for serving) – Used for roasting the garlic and enriching the hummus. Choose a good quality extra virgin olive oil for the best flavor.
- Canned Chickpeas: 1 can (15-ounce), rinsed and drained – The base of our hummus, providing substance and protein. Rinsing removes excess sodium and liquid. (Alternatively, use about 1.5 cups of cooked dried chickpeas).
- Tahini: 1/2 cup – A crucial ingredient made from ground sesame seeds, it provides the characteristic nutty flavor and creamy texture. Stir well before measuring if separated.
- Lemon Juice: 1/4 cup (from 1-2 fresh lemons) – Adds essential brightness and tang to cut through the richness. Freshly squeezed is highly recommended.
- Ice Water: 3-6 tablespoons – The secret weapon for incredibly smooth and fluffy hummus. Add gradually while blending.
- Ground Cumin: 1 teaspoon – Adds a warm, earthy depth that complements the garlic and chickpeas beautifully.
- Salt: 3/4 teaspoon (or to taste) – Enhances all the other flavors. Adjust based on your preference and the saltiness of your chickpeas/tahini.
- Optional Garnishes: Pinch of paprika, chopped fresh parsley, a few whole chickpeas – For presentation and added flavor/texture.
Instructions
Follow these steps carefully to achieve roasted garlic hummus perfection:
- Preheat Oven & Prepare Garlic: Preheat your oven to 400°F (200°C). Slice off the top 1/4 to 1/2 inch of the garlic head, exposing the tops of the cloves. Leave the skin on the rest of the head.
- Roast the Garlic: Place the garlic head, cut-side up, on a small piece of aluminum foil. Drizzle 1 tablespoon of olive oil over the exposed cloves, ensuring they are lightly coated. Wrap the garlic head loosely but securely in the foil. Place it directly on the oven rack or on a small baking sheet.
- Roasting Time: Roast for 40-60 minutes. The time can vary depending on the size and freshness of your garlic. It’s ready when the cloves are very soft, caramelized, and golden brown. You should be able to easily pierce a clove with a knife or fork.
- Cool and Extract Garlic: Carefully remove the foil packet from the oven and let it cool for 10-15 minutes, or until cool enough to handle. Once cooled, simply squeeze the base of the garlic head, and the soft, roasted cloves should pop right out. Discard the papery skins.
- Prepare Chickpeas (Optional Tip for Extra Smoothness): While the garlic roasts/cools, you can take an extra step for ultra-creamy hummus. Place the rinsed and drained chickpeas in a bowl and cover them with water. Gently rub the chickpeas between your hands. The skins should loosen and float to the top. Skim off the skins and discard. This step is optional but highly recommended for the smoothest texture. Drain the peeled chickpeas well.
- Combine Initial Ingredients: In the bowl of a food processor, combine the well-stirred tahini and the fresh lemon juice. Process for 1 minute, scraping down the sides and bottom of the bowl. This step, called “whipping” the tahini, helps create a smoother, creamier base. The mixture might seize up slightly – this is normal.
- Add Roasted Garlic & Spices: Add the squeezed roasted garlic cloves, ground cumin, and salt to the food processor with the tahini-lemon mixture. Process for another 30-60 seconds until the garlic is fully incorporated and the mixture is smooth, scraping down the sides as needed.
- Incorporate Chickpeas: Add half of the drained chickpeas (peeled or unpeeled) to the food processor. Process for 1 minute. Scrape down the sides, then add the remaining chickpeas and process for another 1-2 minutes until thick and relatively smooth.
- Achieve Ultimate Creaminess: With the food processor running, slowly drizzle in the ice water, one tablespoon at a time. Continue processing for another 2-5 minutes. This extended blending time incorporating ice water is key to achieving a light, airy, and incredibly smooth texture. Stop adding water when you reach your desired consistency – it should be creamy and easily scoopable, not watery.
- Add Olive Oil: With the processor still running, drizzle in the remaining 2 tablespoons of olive oil. Process for another 30 seconds until fully combined and the hummus is glossy.
- Taste and Adjust: Stop the food processor and taste the hummus. Adjust seasoning as needed – add more salt for flavor, a bit more lemon juice for tanginess, or even a touch more cumin if desired. Blend briefly to incorporate any additions.
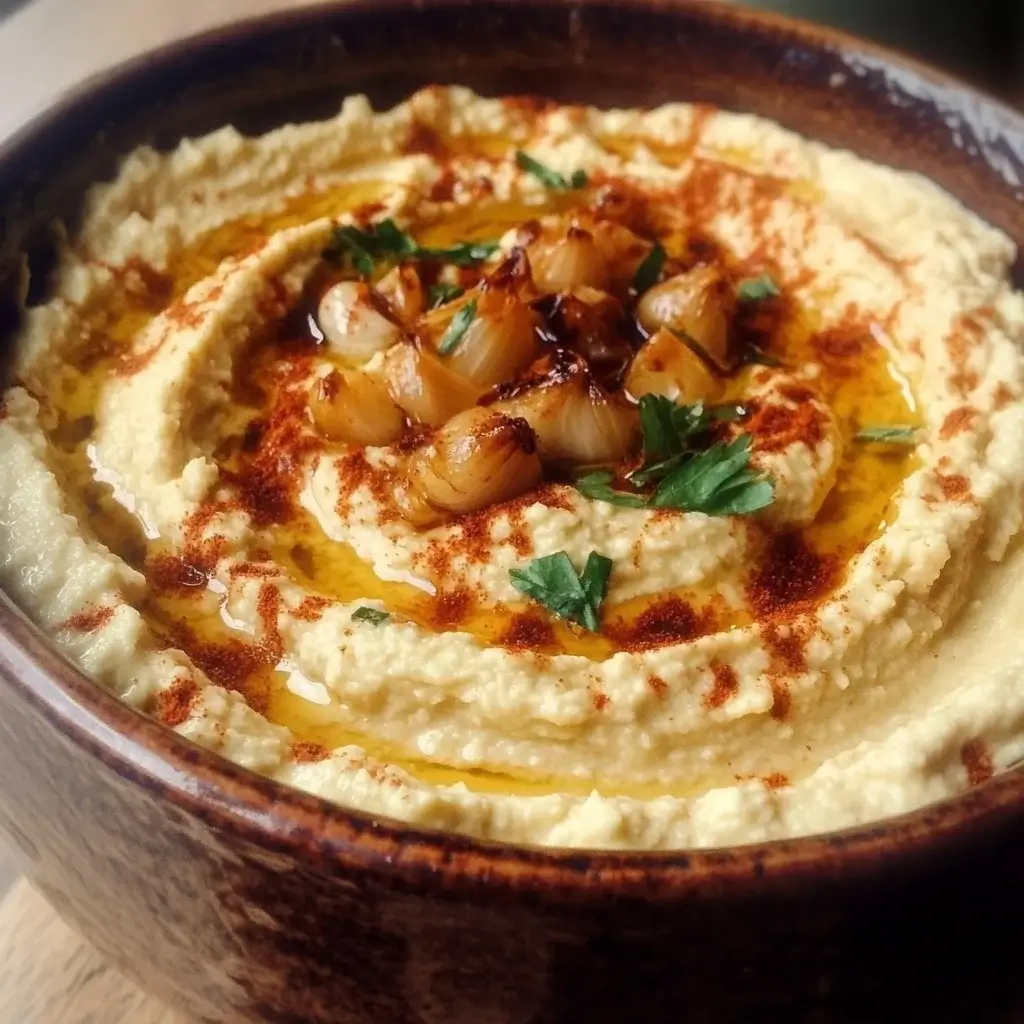
- Serve: Transfer the roasted garlic hummus to a serving bowl. Use the back of a spoon to create a swirl on top. Drizzle generously with extra virgin olive oil and garnish with a pinch of paprika, chopped fresh parsley, and/or a few reserved whole chickpeas, if desired.
Nutrition Facts
- Servings: Approximately 8 servings (assuming about 1/4 cup per serving)
- Calories per serving: Roughly 150-180 kcal (Estimate depends heavily on the amount of olive oil and tahini used)
- Protein: A good source of plant-based protein (approx. 4-5g per serving), essential for muscle repair and satiety.
- Fiber: Rich in dietary fiber (approx. 4-6g per serving) from the chickpeas, promoting digestive health and fullness.
- Healthy Fats: Contains monounsaturated fats from olive oil and tahini, which are beneficial for heart health.
(Note: These are estimates. Exact nutritional values vary based on specific ingredients and portion sizes.)
Preparation time
- Active Preparation: 15-20 minutes (rinsing chickpeas, prepping garlic, blending)
- Roasting Time: 40-60 minutes
- Cooling Time: 10-15 minutes
- Total Time: Approximately 1 hour 10 minutes to 1 hour 35 minutes
How to Serve Roasted Garlic Hummus
This versatile dip pairs wonderfully with a wide array of foods. Here are some serving suggestions:
- Classic Pairings:
- Warm pita bread (whole wheat or white), cut into wedges
- Pita chips (store-bought or homemade)
- Crispy crackers (seeded, whole grain, rice crackers)
- Pretzel crisps or pretzel rods
- Fresh Vegetables (Crudités):
- Carrot sticks
- Celery sticks
- Cucumber slices or spears
- Bell pepper strips (red, yellow, orange, green)
- Cherry tomatoes
- Broccoli florets
- Cauliflower florets
- Radish slices
- Sugar snap peas or snow peas
- Endive leaves (great natural scoops!)
- Creative Uses:
- Sandwich/Wrap Spread: Use instead of mayonnaise or mustard for a flavorful, healthier spread in sandwiches, wraps, or pitas. Excellent with falafel, grilled vegetables, or turkey.
- Bowl Topping: Add a dollop to grain bowls (quinoa, farro), salad bowls, or Buddha bowls for extra creaminess and protein.
- Baked Potato Topping: A delicious and healthier alternative to sour cream or butter on baked potatoes or sweet potatoes.
- Pasta Sauce Base: Thin it out with a little pasta water or vegetable broth to create a creamy, vegan pasta sauce.
- Deviled Egg Filling: Mix a tablespoon or two into your yolk mixture for a unique twist on deviled eggs.
- Dip for Grilled Meats/Vegetables: Serve alongside grilled chicken, lamb skewers (kebabs), roasted vegetables (like eggplant or zucchini), or falafel.
- Pizza Base: Spread a thin layer on pizza dough instead of tomato sauce for a Mediterranean-style pizza, topped with feta, olives, and spinach.
Additional Tips for the Perfect Roasted Garlic Hummus
- Tahini Quality Matters: Use a high-quality, smooth, and slightly runny tahini. Brands can vary significantly in flavor and texture. Look for tahini made from 100% roasted sesame seeds. If your tahini is very thick or bitter, it can negatively impact the final hummus. Stir it very well before using, as oil separation is natural.
- Don’t Skimp on Blending Time: The key to incredibly smooth, restaurant-style hummus is patience during the blending process. Let the food processor run for a full 4-5 minutes after adding the ice water. This aerates the mixture and breaks down the chickpeas fully.
- Ice Water is Crucial: It might seem counterintuitive, but adding ice water helps make the hummus exceptionally light and fluffy. Add it gradually while the processor is running until you reach the perfect creamy consistency.
- Peel Those Chickpeas (If You Have Time): While optional, removing the thin skins from the chickpeas makes a noticeable difference in achieving the smoothest possible texture. It takes about 10 extra minutes but is worth it for hummus purists.
- Adjust Garlic Intensity: Love garlic? Feel free to roast an extra head or a few extra cloves. If you find the roasted garlic flavor too strong (unlikely, as roasting mellows it considerably), start with slightly fewer cloves next time. You can always blend in more raw garlic (just a tiny bit!) if you want a sharper kick after tasting.
- Control the Tang: Taste the hummus before serving. If you prefer a brighter, tangier flavor, add another squeeze of fresh lemon juice. If it tastes too tangy (perhaps your lemons were very acidic), you can sometimes balance it with a tiny pinch more salt or even a touch more tahini.
- Storage Savvy: Store homemade hummus in an airtight container in the refrigerator. To prolong freshness and prevent drying, drizzle a thin layer of olive oil over the surface before sealing the container. It should last for 4-7 days.
- Flavor Variations: Once you master the basic roasted garlic hummus, get creative! Try adding other ingredients during the blending process:
- A pinch of smoked paprika for smokiness.
- Fresh herbs like cilantro or dill.
- A deseeded jalapeño or a pinch of cayenne pepper for heat.
- Sun-dried tomatoes (oil-packed, drained).
- Roasted red peppers.
- Kalamata olives (pitted).
Frequently Asked Questions (FAQ) about Roasted Garlic Hummus
- Q: How long does homemade roasted garlic hummus last in the fridge?
- A: When stored properly in an airtight container, homemade hummus typically lasts for 4 to 7 days in the refrigerator. Adding a thin layer of olive oil on top before sealing can help keep it fresh longer. Always trust your senses – if it smells off or looks moldy, discard it.
- Q: Can I freeze roasted garlic hummus?
- A: Yes, you can freeze hummus, although the texture might change slightly upon thawing – it can sometimes become a bit grainier. Freeze it in an airtight, freezer-safe container, leaving a little headspace for expansion. Drizzle olive oil on top before freezing. Thaw it in the refrigerator overnight. Stir well after thawing; you might need to blend it briefly with a touch more olive oil or a splash of water to restore some creaminess. It’s best consumed within 1-2 months of freezing.
- Q: Do I really need to peel the chickpeas? It seems like a lot of work.
- A: No, you don’t have to peel the chickpeas. Your hummus will still be delicious! However, peeling them is the secret to achieving that ultra-smooth, velvety texture found in many restaurant-quality hummuses. If you prioritize texture, it’s worth the extra effort. If you’re short on time or don’t mind a slightly more rustic texture, skip this step.
- Q: My hummus isn’t smooth and creamy. What went wrong?
- A: Several factors could be at play:
- Not Blending Long Enough: Ensure you blend for at least 4-5 minutes total, especially after adding the ice water.
- Not Enough Liquid: You might need a bit more ice water or olive oil. Add liquid gradually while blending until smooth.
- Chickpea Skins: Unpeeled chickpeas can result in a slightly grainier texture.
- Tahini Quality: Very thick or gritty tahini can affect smoothness.
- Food Processor Power: A less powerful food processor might struggle to break everything down completely.
- A: Several factors could be at play:
- Q: Can I make this recipe without tahini?
- A: While traditional hummus relies heavily on tahini for its signature flavor and creaminess, you can make a chickpea dip without it. It won’t taste exactly like classic hummus, but it can still be tasty. You can try substituting with a neutral-flavored nut butter (like cashew butter, very smooth), Greek yogurt (for a non-vegan version), or simply using more olive oil and potentially adding a bit of aquafaba (the liquid from the chickpea can) for creaminess. The roasted garlic flavor will still shine through.
- Q: Is roasted garlic hummus healthy?
- A: Generally, yes! Roasted garlic hummus is considered a healthy snack or condiment. It’s packed with plant-based protein and fiber from chickpeas, healthy fats from tahini and olive oil, and nutrients from garlic and lemon juice. It’s naturally vegan and gluten-free. Portion control is still key, especially considering the calorie density from tahini and olive oil, and be mindful of what you’re dipping into it (choose veggies over mountains of chips for the healthiest option).
- Q: Can I use pre-roasted garlic from a jar?
- A: You can, but the flavor will likely be different and potentially less intense or sweet than freshly roasted garlic. Jarred roasted garlic often sits in oil or vinegar, which can alter its taste profile. Roasting garlic fresh is easy and yields the best, most authentic flavor for this recipe. If you must use jarred, ensure it’s packed in oil (not vinegar) and drain it well. You might need to adjust the amount based on taste.
- Q: What if my garlic burns while roasting?
- A: If some cloves get dark brown or slightly blackened, they might impart a bitter taste. It’s best to discard any truly burnt cloves. If only the edges are dark, you can sometimes trim those off and use the softer, golden parts. If the whole head is burnt, unfortunately, you’ll need to roast a new head of garlic. Keep an eye on it towards the end of the roasting time, checking for softness and a golden-brown color rather than black. Wrapping it well in foil helps prevent burning.

Roasted Garlic Hummus Dip
Ingredients
Here’s what you’ll need to create this incredibly flavorful and creamy Roasted Garlic Hummus:
- Garlic: 1 whole head – The star of the show, roasting mellows its flavor to sweet perfection.
- Olive Oil: 3 tablespoons, divided (plus more for serving) – Used for roasting the garlic and enriching the hummus. Choose a good quality extra virgin olive oil for the best flavor.
- Canned Chickpeas: 1 can (15-ounce), rinsed and drained – The base of our hummus, providing substance and protein. Rinsing removes excess sodium and liquid. (Alternatively, use about 1.5 cups of cooked dried chickpeas).
- Tahini: 1/2 cup – A crucial ingredient made from ground sesame seeds, it provides the characteristic nutty flavor and creamy texture. Stir well before measuring if separated.
- Lemon Juice: 1/4 cup (from 1-2 fresh lemons) – Adds essential brightness and tang to cut through the richness. Freshly squeezed is highly recommended.
- Ice Water: 3-6 tablespoons – The secret weapon for incredibly smooth and fluffy hummus. Add gradually while blending.
- Ground Cumin: 1 teaspoon – Adds a warm, earthy depth that complements the garlic and chickpeas beautifully.
- Salt: 3/4 teaspoon (or to taste) – Enhances all the other flavors. Adjust based on your preference and the saltiness of your chickpeas/tahini.
- Optional Garnishes: Pinch of paprika, chopped fresh parsley, a few whole chickpeas – For presentation and added flavor/texture.
Instructions
Follow these steps carefully to achieve roasted garlic hummus perfection:
- Preheat Oven & Prepare Garlic: Preheat your oven to 400°F (200°C). Slice off the top 1/4 to 1/2 inch of the garlic head, exposing the tops of the cloves. Leave the skin on the rest of the head.
- Roast the Garlic: Place the garlic head, cut-side up, on a small piece of aluminum foil. Drizzle 1 tablespoon of olive oil over the exposed cloves, ensuring they are lightly coated. Wrap the garlic head loosely but securely in the foil. Place it directly on the oven rack or on a small baking sheet.
- Roasting Time: Roast for 40-60 minutes. The time can vary depending on the size and freshness of your garlic. It’s ready when the cloves are very soft, caramelized, and golden brown. You should be able to easily pierce a clove with a knife or fork.
- Cool and Extract Garlic: Carefully remove the foil packet from the oven and let it cool for 10-15 minutes, or until cool enough to handle. Once cooled, simply squeeze the base of the garlic head, and the soft, roasted cloves should pop right out. Discard the papery skins.
- Prepare Chickpeas (Optional Tip for Extra Smoothness): While the garlic roasts/cools, you can take an extra step for ultra-creamy hummus. Place the rinsed and drained chickpeas in a bowl and cover them with water. Gently rub the chickpeas between your hands. The skins should loosen and float to the top. Skim off the skins and discard. This step is optional but highly recommended for the smoothest texture. Drain the peeled chickpeas well.
- Combine Initial Ingredients: In the bowl of a food processor, combine the well-stirred tahini and the fresh lemon juice. Process for 1 minute, scraping down the sides and bottom of the bowl. This step, called “whipping” the tahini, helps create a smoother, creamier base. The mixture might seize up slightly – this is normal.
- Add Roasted Garlic & Spices: Add the squeezed roasted garlic cloves, ground cumin, and salt to the food processor with the tahini-lemon mixture. Process for another 30-60 seconds until the garlic is fully incorporated and the mixture is smooth, scraping down the sides as needed.
- Incorporate Chickpeas: Add half of the drained chickpeas (peeled or unpeeled) to the food processor. Process for 1 minute. Scrape down the sides, then add the remaining chickpeas and process for another 1-2 minutes until thick and relatively smooth.
- Achieve Ultimate Creaminess: With the food processor running, slowly drizzle in the ice water, one tablespoon at a time. Continue processing for another 2-5 minutes. This extended blending time incorporating ice water is key to achieving a light, airy, and incredibly smooth texture. Stop adding water when you reach your desired consistency – it should be creamy and easily scoopable, not watery.
- Add Olive Oil: With the processor still running, drizzle in the remaining 2 tablespoons of olive oil. Process for another 30 seconds until fully combined and the hummus is glossy.
- Taste and Adjust: Stop the food processor and taste the hummus. Adjust seasoning as needed – add more salt for flavor, a bit more lemon juice for tanginess, or even a touch more cumin if desired. Blend briefly to incorporate any additions.
- Serve: Transfer the roasted garlic hummus to a serving bowl. Use the back of a spoon to create a swirl on top. Drizzle generously with extra virgin olive oil and garnish with a pinch of paprika, chopped fresh parsley, and/or a few reserved whole chickpeas, if desired.
Nutrition
- Serving Size: one normal portion
- Calories: 180
- Fiber: 6g
- Protein: 5g