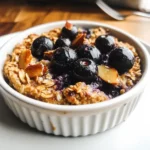
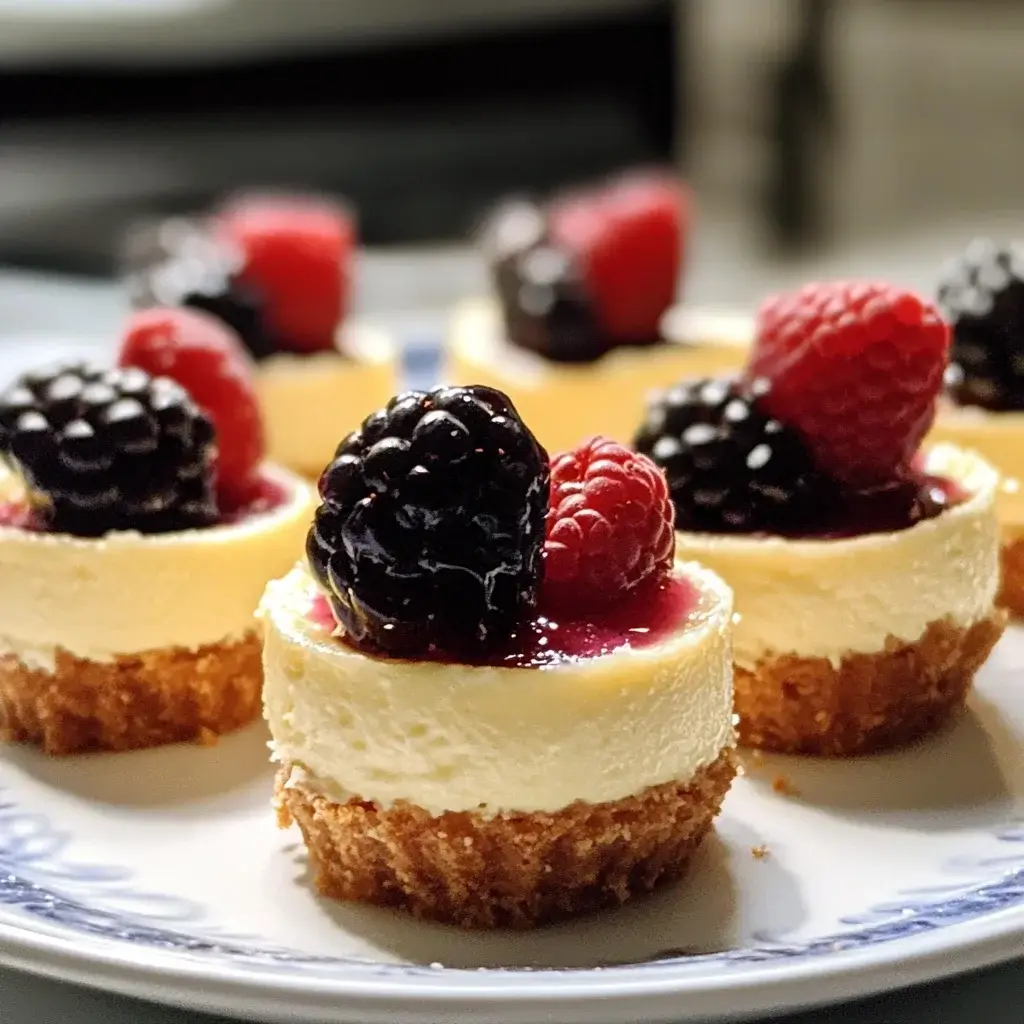
There are certain recipes that just sing summer, sunshine, and pure, unadulterated joy. For my family, these Mini Berry Cheesecake Bites have become exactly that – a staple for gatherings, a guaranteed smile-inducer, and frankly, my secret weapon for potlucks. I remember the first time I made them; I was slightly intimidated by cheesecake, having heard tales of cracks and water baths. But the miniature format seemed less daunting, more forgiving. The result? Utterly delightful. My kids devoured them, my husband declared them “dangerously good,” and even my usually reserved mother-in-law asked for the recipe. There’s something magical about the combination: the buttery, crisp graham cracker crust providing the perfect textural counterpoint to the impossibly smooth, tangy cream cheese filling, all crowned with vibrant, juicy berries that burst with freshness. They are perfectly portioned, eliminating the need for slicing and serving, making them ideal for crowds or just a manageable treat. The rich creaminess isn’t overwhelming in this bite-sized form; instead, it feels indulgent yet light. Watching everyone’s eyes light up as they take that first bite – the slight resistance of the crust, the yielding creaminess of the filling, the pop of berry flavour – is incredibly rewarding. These aren’t just cheesecakes; they’re tiny vehicles of happiness, surprisingly simple to whip up, and guaranteed to disappear fast. They’ve graced birthday parties, BBQs, holiday dessert tables, and quiet weeknight evenings when a little sweetness was needed. Their versatility and crowd-pleasing nature make them a recipe I return to again and again, and I’m thrilled to share the process so you can create these little bites of bliss in your own kitchen. They truly are a testament to the fact that sometimes, the best things come in small, delicious packages. The vibrant colours alone make any dessert spread look instantly more appealing, and the combination of textures and flavours – crunchy, creamy, tangy, sweet, fruity – hits all the right notes. Making them has become a cherished ritual, often involving little hands eager to help press the crusts or arrange the berries, adding another layer of sweetness to the experience.
Ingredients
Here’s what you’ll need to create these delightful mini cheesecakes. Using quality ingredients, especially full-fat cream cheese and fresh berries, will yield the best flavour and texture. Ensure your cold ingredients are brought to room temperature for the smoothest filling.
For the Graham Cracker Crust:
- 1 ½ cups Graham Cracker Crumbs: (About 10-12 full graham cracker sheets) Finely crushed, these form the buttery, crunchy base. You can buy pre-made crumbs or crush sheets yourself in a food processor or zip-top bag with a rolling pin.
- ¼ cup Granulated Sugar: Adds a touch of sweetness to the crust and helps it bind.
- 6 tablespoons Unsalted Butter: Melted. This is the binder that holds the crust together and gives it a rich flavour.
For the Cheesecake Filling:
- 16 ounces (two 8-ounce blocks) Full-Fat Cream Cheese: Softened to room temperature. This is crucial for a smooth, lump-free filling. Full-fat provides the richest flavour and creamiest texture.
- ¾ cup Granulated Sugar: Provides the primary sweetness for the cheesecake filling.
- ½ teaspoon Pure Vanilla Extract: Enhances the other flavours and adds warmth. Use pure extract for the best taste.
- 2 Large Eggs: Room temperature. Eggs provide structure and richness. Room temperature eggs incorporate more easily, preventing overmixing.
- ¼ cup Sour Cream or Plain Greek Yogurt: Room temperature. Adds moisture and a pleasant tanginess that balances the richness of the cream cheese.
- 1 tablespoon All-Purpose Flour: Helps prevent cracking and gives the cheesecake a slightly firmer structure.
- 1 tablespoon Lemon Juice: Freshly squeezed is best. Brightens the flavour and adds a subtle citrusy note that complements the berries.
For the Berry Topping:
- 1 ½ cups Mixed Fresh Berries: Such as blueberries, raspberries, sliced strawberries, blackberries. Washed and gently dried. These provide a fresh, colourful, and flavourful finish. You can use a single type or a mix.
- Optional Glaze/Sauce: (1 tablespoon sugar + 1 tablespoon water, heated, or strained berry jam) For added shine and sweetness on the berries.
Instructions
Follow these steps carefully for perfectly creamy and delicious Mini Berry Cheesecake Bites. Patience during mixing and cooling is key!
1. Prepare the Pan and Oven:
Preheat your oven to 325°F (160°C). Line a standard 12-cup muffin tin with paper liners. If you have a mini cheesecake pan with removable bottoms, you can use that (grease it lightly if not using liners). Using liners makes removal much easier and cleaner. Set the prepared tin aside.
2. Make the Graham Cracker Crust:
In a medium bowl, combine the graham cracker crumbs and granulated sugar. Pour the melted butter over the crumb mixture. Stir with a fork until all the crumbs are evenly moistened. The mixture should resemble wet sand.
3. Press Crusts into Liners:
Spoon approximately 1.5 tablespoons of the crust mixture into each paper liner in the muffin tin. Use the bottom of a small glass, a spice jar, or your fingers to press the crumbs down firmly and evenly into the base of each liner. A flat, compact base prevents the filling from seeping underneath.
4. Bake the Crusts (Optional but Recommended):
Place the muffin tin in the preheated oven and bake the crusts for 5-7 minutes, just until set and slightly fragrant. This pre-baking helps create a crisper crust. Remove the tin from the oven and let it cool slightly on a wire rack while you prepare the filling.
5. Prepare the Cheesecake Filling:
In a large bowl, using an electric hand mixer or a stand mixer fitted with the paddle attachment, beat the softened cream cheese on medium-low speed until completely smooth and creamy. Scrape down the sides and bottom of the bowl frequently to ensure there are no lumps. This initial creaming is vital for texture. Do not overbeat at high speed at this stage.
6. Add Sugar and Flavourings:
Add the granulated sugar, vanilla extract, and lemon juice to the creamed cheese. Beat on low speed until just combined and smooth. Scrape the bowl down again. Avoid incorporating too much air.
7. Incorporate Eggs One at a Time:
Add the room temperature eggs one at a time, beating on low speed just until the yellow yolk disappears after each addition. Do not overmix once the eggs are added, as this is a primary cause of cracking and dense texture. Scrape the bowl down between additions.
8. Gently Mix in Sour Cream and Flour:
Add the room temperature sour cream (or Greek yogurt) and the tablespoon of flour. Mix on the lowest speed just until combined. Give the batter a final gentle stir with a spatula, ensuring everything is incorporated from the bottom of the bowl, but be careful not to deflate the mixture. The final batter should be thick, smooth, and creamy.
9. Fill the Muffin Liners:
Carefully spoon or pipe the cheesecake filling evenly over the pre-baked crusts in the muffin liners. Fill each liner about three-quarters full. Avoid overfilling, as they will puff slightly during baking. Smooth the tops gently with the back of a small spoon or an offset spatula if needed.
10. Bake the Cheesecakes:
Place the muffin tin back into the preheated 325°F (160°C) oven. Bake for 18-22 minutes. The cheesecakes are done when the edges are set, and the centres are almost set but still have a slight wobble (they shouldn’t look wet or liquid). They will continue to cook and firm up as they cool. Overbaking leads to dry texture and potential cracking, even in minis.
11. Cool Gradually (Crucial Step):
Turn off the oven. Leave the oven door slightly ajar (prop it open with a wooden spoon if necessary) and let the cheesecakes cool in the turned-off oven for 30 minutes to 1 hour. This gradual cooling helps prevent cracks from forming due to drastic temperature changes.
12. Cool at Room Temperature:
Carefully remove the muffin tin from the oven and place it on a wire rack. Let the mini cheesecakes cool completely in the tin at room temperature, which usually takes another 1-2 hours.
13. Chill Thoroughly:
Once completely cool, cover the muffin tin loosely with plastic wrap (avoid touching the tops of the cheesecakes) and transfer it to the refrigerator. Chill for at least 4 hours, but preferably overnight. Chilling is essential for the cheesecake to fully set and for the flavours to meld and develop. Do not attempt to serve them before they are thoroughly chilled.
14. Top and Serve:
Just before serving, carefully remove the mini cheesecakes from the muffin tin (and remove the paper liners if desired, though they help with handling). Arrange them on a serving platter. Top each mini cheesecake with a generous amount of fresh mixed berries. If desired, you can lightly toss the berries with a tablespoon of sugar for extra sweetness or drizzle with a simple glaze or thinned jam for shine.
Nutrition Facts
(Nutritional information is an estimate only and can vary based on specific ingredients used.)
- Servings: 12 mini cheesecakes
- Calories per serving (approximate): 300-350 kcal (depending on specific ingredients and topping quantity)
- Fat: Primarily from cream cheese, butter, and eggs, contributing to the rich texture. Contains both saturated and unsaturated fats.
- Carbohydrates: Mainly from the graham cracker crust (crumbs and sugar) and the sugar in the filling and berries.
- Protein: Provided by the eggs and cream cheese, contributing to the structure.
- Sugar: Comes from the granulated sugar in the crust and filling, as well as naturally occurring sugars in the berries.
- Sodium: A small amount present naturally in ingredients and potentially added if using salted butter (though unsalted is recommended).
Preparation Time
This recipe requires planning due to the essential chilling time, but the active work is quite manageable.
- Active Preparation Time: Approximately 25-35 minutes (making crust, mixing filling).
- Bake Time: 18-22 minutes.
- Cooling Time: 30-60 minutes in the oven + 1-2 hours at room temperature.
- Chilling Time: Minimum 4 hours, preferably overnight (8+ hours).
- Total Time (Including Inactive Chilling): Approximately 6.5 – 12+ hours.
How to Serve
These Mini Berry Cheesecake Bites are versatile and can be presented in various delightful ways:
- Classic Platter:
- Arrange the chilled cheesecakes neatly on a large, attractive platter or cake stand.
- Top each one generously with fresh mixed berries just before serving for maximum freshness and visual appeal.
- Individual Plates:
- Serve one or two cheesecakes on small dessert plates.
- Garnish with a sprig of fresh mint alongside the berries.
- Add a small dollop of lightly sweetened whipped cream next to the cheesecake.
- Drizzle the plate (not necessarily the cheesecake itself) with a berry coulis or a thin chocolate sauce for extra elegance.
- Dessert Buffet:
- Integrate them into a larger dessert spread. Their small size makes them perfect alongside other treats like brownies, cookies, or fruit tarts.
- Keep the paper liners on for easier handling by guests in a buffet setting.
- With Sauce Options:
- Offer small bowls of different sauces on the side – raspberry coulis, strawberry sauce, warm chocolate ganache, or caramel sauce – allowing guests to customize their bites.
- Temperature Consideration:
- Always serve these cheesecakes chilled. They should be removed from the refrigerator just before topping and serving for the best texture and flavour. They tend to soften if left at room temperature for too long.
- Beverage Pairings:
- Pair beautifully with coffee, espresso, or tea.
- For an evening treat, consider a light dessert wine like a Moscato d’Asti or a sparkling Rosé, whose fruitiness complements the berries.
Additional Tips
Mastering mini cheesecakes is easy with these extra pointers!
- Room Temperature is Non-Negotiable: This is the golden rule for smooth cheesecake. Softened cream cheese blends lump-free. Room temperature eggs and sour cream incorporate evenly without requiring excessive mixing, which prevents toughness and cracks. Take them out 1-2 hours before you start.
- Avoid Overmixing at All Costs: Especially after adding the eggs! Overmixing incorporates too much air, which causes the cheesecakes to puff up dramatically in the oven and then collapse and crack upon cooling. Mix on low speed just until ingredients are combined.
- Crust Customization: Don’t feel limited to graham crackers! Try using crushed vanilla wafers, shortbread cookies, Oreos (remove cream filling for a less sweet crust or leave it in for extra decadence), gingersnaps, or even speculoos (Biscoff) cookies for different flavour profiles. You can also add a tablespoon of cocoa powder to the graham cracker crust for a chocolatey base.
- Berry Best Practices: While fresh berries offer the best texture and appearance, frozen berries can be used in a pinch for the topping, especially if making a compote or sauce. If using frozen berries directly, thaw and drain them very well to avoid excess moisture making the tops soggy. Consider tossing fresh berries with a tiny amount of cornstarch and sugar if making a cooked topping to help thicken the juices.
- Scrape Down the Bowl Religiously: Throughout the mixing process, stop frequently and scrape down the sides and bottom of the bowl with a rubber spatula. This ensures all ingredients, especially the cream cheese, are fully incorporated and prevents hidden lumps, leading to a uniformly smooth texture.
- Perfect Filling Technique: For ultra-smooth tops, after filling the liners, gently tap the muffin tin on the counter a few times to release any trapped air bubbles before baking. Using a small cookie scoop can help portion the filling evenly and neatly.
- Master the Cooling Process: Don’t rush the cooling! The gradual cool-down in the turned-off oven, followed by cooling completely at room temperature before chilling, is the best defence against cracks and ensures the creamiest texture. Drastic temperature changes are the enemy of perfect cheesecake.
- Make-Ahead and Storage Strategy: These are perfect for making ahead! Prepare and bake them a day or two before needed. Cool completely and store, covered, in the refrigerator. Wait to add the fresh berry topping until just before serving to keep the berries fresh and prevent the crust/cheesecake from getting soggy. They will last well in the fridge for 3-4 days (without berry topping).
FAQ
Got questions? Here are answers to common queries about making Mini Berry Cheesecake Bites.
1. Can I make these Mini Cheesecakes No-Bake?
While you could adapt this into a no-bake version (using a similar crust, and a filling typically set with gelatin or whipped cream instead of eggs), the texture and flavour will be quite different. Baked cheesecake has a denser, richer, and distinctly “cooked” flavour profile due to the eggs setting, whereas no-bake is often lighter, fluffier, and relies purely on chilling to set. This specific recipe is designed for baking.
2. Why did my Mini Cheesecakes crack?
Cracking, even in minis, can happen! Common culprits include:
Overmixing: Incorporating too much air, especially after adding eggs.
Overbaking: Baking until the centre is completely firm instead of slightly wobbly.
Temperature Shock: Cooling them too quickly (e.g., moving directly from a hot oven to the fridge). Follow the gradual cooling steps outlined.
Ingredients Too Cold: Using cold cream cheese, eggs, or sour cream can lead to lumps and requires more mixing, increasing crack risk.
Luckily, the berry topping hides minor imperfections beautifully!
3. Can I use low-fat or non-fat cream cheese or sour cream?
You can, but it’s generally not recommended for the best results. Full-fat ingredients provide the necessary richness, creaminess, and structure. Low-fat versions contain more water and stabilizers, which can result in a slightly grainier, less rich, and potentially runnier cheesecake. If you must substitute, expect a noticeable difference in texture and flavour. Greek yogurt is often a better substitute for sour cream than low-fat versions.
4. How long do these Mini Berry Cheesecake Bites last?
Stored properly in an airtight container in the refrigerator, the plain (untopped) mini cheesecakes will last for about 4-5 days. Once topped with fresh berries, they are best consumed within 1-2 days, as the berries will release moisture over time, potentially making the tops slightly soggy.
5. Can I freeze these Mini Cheesecakes?
Yes, mini cheesecakes freeze quite well!
Cool completely as directed.
Do not add the berry topping.
Place the cheesecakes (you can leave them in the liners) on a baking sheet and freeze until solid (about 1-2 hours).
Once solid, wrap each cheesecake individually in plastic wrap, then place them in an airtight freezer bag or container.
Freeze for up to 1-2 months for best quality.
To thaw, unwrap them and place them in the refrigerator overnight. Add fresh berry topping just before serving. The crust might be slightly softer after freezing.
6. Can I use different fruit toppings besides mixed berries?
Absolutely! These are incredibly versatile. Consider topping them with:
Cherry pie filling
Caramel sauce and a sprinkle of sea salt
Lemon curd and a small dollop of whipped cream
Chocolate ganache and chocolate shavings
Sliced peaches or mango (fresh or lightly sautéed)
Passion fruit pulp
Adjust the sweetness of the filling slightly depending on the sweetness of your chosen topping.
7. Do I need a special mini cheesecake pan, or is a muffin tin okay?
A standard 12-cup muffin tin with paper liners works perfectly for this recipe and is what most people have readily available. The liners make removal easy. A dedicated mini cheesecake pan (often with 12 or 24 wells and removable bottoms) creates a straighter side profile and eliminates the need for liners, but it’s not essential for delicious results. If using a mini cheesecake pan without liners, be sure to grease the wells lightly.
8. How do I prevent the graham cracker crust from getting soggy?
Several things help:
Pre-baking: Baking the crust for 5-7 minutes before adding the filling helps set it and creates a slight barrier.
Firm Packing: Ensure you press the crumbs down firmly and evenly.
Proper Cooling/Chilling: Ensure the cheesecakes are fully chilled before topping.
Topping Just Before Serving: Add moist toppings like fresh berries right before you plan to serve them. Avoid letting topped cheesecakes sit for many hours or overnight, as moisture will inevitably seep down.

Mini Berry Cheesecake Bites
Ingredients
Here’s what you’ll need to create these delightful mini cheesecakes. Using quality ingredients, especially full-fat cream cheese and fresh berries, will yield the best flavour and texture. Ensure your cold ingredients are brought to room temperature for the smoothest filling.
For the Graham Cracker Crust:
- 1 ½ cups Graham Cracker Crumbs: (About 10–12 full graham cracker sheets) Finely crushed, these form the buttery, crunchy base. You can buy pre-made crumbs or crush sheets yourself in a food processor or zip-top bag with a rolling pin.
- ¼ cup Granulated Sugar: Adds a touch of sweetness to the crust and helps it bind.
- 6 tablespoons Unsalted Butter: Melted. This is the binder that holds the crust together and gives it a rich flavour.
For the Cheesecake Filling:
- 16 ounces (two 8-ounce blocks) Full-Fat Cream Cheese: Softened to room temperature. This is crucial for a smooth, lump-free filling. Full-fat provides the richest flavour and creamiest texture.
- ¾ cup Granulated Sugar: Provides the primary sweetness for the cheesecake filling.
- ½ teaspoon Pure Vanilla Extract: Enhances the other flavours and adds warmth. Use pure extract for the best taste.
- 2 Large Eggs: Room temperature. Eggs provide structure and richness. Room temperature eggs incorporate more easily, preventing overmixing.
- ¼ cup Sour Cream or Plain Greek Yogurt: Room temperature. Adds moisture and a pleasant tanginess that balances the richness of the cream cheese.
- 1 tablespoon All-Purpose Flour: Helps prevent cracking and gives the cheesecake a slightly firmer structure.
- 1 tablespoon Lemon Juice: Freshly squeezed is best. Brightens the flavour and adds a subtle citrusy note that complements the berries.
For the Berry Topping:
- 1 ½ cups Mixed Fresh Berries: Such as blueberries, raspberries, sliced strawberries, blackberries. Washed and gently dried. These provide a fresh, colourful, and flavourful finish. You can use a single type or a mix.
- Optional Glaze/Sauce: (1 tablespoon sugar + 1 tablespoon water, heated, or strained berry jam) For added shine and sweetness on the berries.
Instructions
Follow these steps carefully for perfectly creamy and delicious Mini Berry Cheesecake Bites. Patience during mixing and cooling is key!
1. Prepare the Pan and Oven:
Preheat your oven to 325°F (160°C). Line a standard 12-cup muffin tin with paper liners. If you have a mini cheesecake pan with removable bottoms, you can use that (grease it lightly if not using liners). Using liners makes removal much easier and cleaner. Set the prepared tin aside.
2. Make the Graham Cracker Crust:
In a medium bowl, combine the graham cracker crumbs and granulated sugar. Pour the melted butter over the crumb mixture. Stir with a fork until all the crumbs are evenly moistened. The mixture should resemble wet sand.
3. Press Crusts into Liners:
Spoon approximately 1.5 tablespoons of the crust mixture into each paper liner in the muffin tin. Use the bottom of a small glass, a spice jar, or your fingers to press the crumbs down firmly and evenly into the base of each liner. A flat, compact base prevents the filling from seeping underneath.
4. Bake the Crusts (Optional but Recommended):
Place the muffin tin in the preheated oven and bake the crusts for 5-7 minutes, just until set and slightly fragrant. This pre-baking helps create a crisper crust. Remove the tin from the oven and let it cool slightly on a wire rack while you prepare the filling.
5. Prepare the Cheesecake Filling:
In a large bowl, using an electric hand mixer or a stand mixer fitted with the paddle attachment, beat the softened cream cheese on medium-low speed until completely smooth and creamy. Scrape down the sides and bottom of the bowl frequently to ensure there are no lumps. This initial creaming is vital for texture. Do not overbeat at high speed at this stage.
6. Add Sugar and Flavourings:
Add the granulated sugar, vanilla extract, and lemon juice to the creamed cheese. Beat on low speed until just combined and smooth. Scrape the bowl down again. Avoid incorporating too much air.
7. Incorporate Eggs One at a Time:
Add the room temperature eggs one at a time, beating on low speed just until the yellow yolk disappears after each addition. Do not overmix once the eggs are added, as this is a primary cause of cracking and dense texture. Scrape the bowl down between additions.
8. Gently Mix in Sour Cream and Flour:
Add the room temperature sour cream (or Greek yogurt) and the tablespoon of flour. Mix on the lowest speed just until combined. Give the batter a final gentle stir with a spatula, ensuring everything is incorporated from the bottom of the bowl, but be careful not to deflate the mixture. The final batter should be thick, smooth, and creamy.
9. Fill the Muffin Liners:
Carefully spoon or pipe the cheesecake filling evenly over the pre-baked crusts in the muffin liners. Fill each liner about three-quarters full. Avoid overfilling, as they will puff slightly during baking. Smooth the tops gently with the back of a small spoon or an offset spatula if needed.
10. Bake the Cheesecakes:
Place the muffin tin back into the preheated 325°F (160°C) oven. Bake for 18-22 minutes. The cheesecakes are done when the edges are set, and the centres are almost set but still have a slight wobble (they shouldn’t look wet or liquid). They will continue to cook and firm up as they cool. Overbaking leads to dry texture and potential cracking, even in minis.
11. Cool Gradually (Crucial Step):
Turn off the oven. Leave the oven door slightly ajar (prop it open with a wooden spoon if necessary) and let the cheesecakes cool in the turned-off oven for 30 minutes to 1 hour. This gradual cooling helps prevent cracks from forming due to drastic temperature changes.
12. Cool at Room Temperature:
Carefully remove the muffin tin from the oven and place it on a wire rack. Let the mini cheesecakes cool completely in the tin at room temperature, which usually takes another 1-2 hours.
13. Chill Thoroughly:
Once completely cool, cover the muffin tin loosely with plastic wrap (avoid touching the tops of the cheesecakes) and transfer it to the refrigerator. Chill for at least 4 hours, but preferably overnight. Chilling is essential for the cheesecake to fully set and for the flavours to meld and develop. Do not attempt to serve them before they are thoroughly chilled.
14. Top and Serve:
Just before serving, carefully remove the mini cheesecakes from the muffin tin (and remove the paper liners if desired, though they help with handling). Arrange them on a serving platter. Top each mini cheesecake with a generous amount of fresh mixed berries. If desired, you can lightly toss the berries with a tablespoon of sugar for extra sweetness or drizzle with a simple glaze or thinned jam for shine.
Nutrition
- Serving Size: one normal portion
- Calories: 350