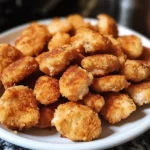

Okay, let’s embark on a culinary journey to create the ultimate homemade chicken nuggets! This isn’t just a recipe; it’s an experience, a way to bring smiles to faces and a healthier, tastier alternative to the usual fast-food fare into your kitchen. I remember the first time I decided to tackle homemade chicken nuggets. My kids, like most, were ardent fans of the drive-thru version, but I was always a bit wary of the ingredient list. I wanted something I could feel good about serving them, something packed with real chicken and flavors I could control. The skepticism on their faces when I announced “homemade nuggets” was palpable. But, oh, the transformation when they took that first bite! Crispy on the outside, juicy and tender on the inside, seasoned to perfection – it was an instant hit. They devoured the entire batch, and my daughter even declared them “way better than the ones from the golden M place!” Since then, these nuggets have become a weekly staple, a go-to for quick dinners, lunchbox surprises, and even party appetizers. The beauty of this recipe lies in its simplicity and adaptability. You know exactly what’s going into them, and the taste is genuinely restaurant-quality, if not better. Get ready to say goodbye to freezer-aisle disappointments and hello to your new family favorite!
Ingredients
Here’s what you’ll need to craft these delectable morsels:
- Boneless, Skinless Chicken Breasts (2 large, about 1.5 lbs / 680g): The star of our show. Using breast meat ensures a lean, tender nugget. You can also use chicken thighs for a juicier, more flavorful (though slightly higher fat) nugget. Ensure they are well-trimmed of any fat or sinew.
- All-Purpose Flour (1 cup / 125g): This creates the first layer for our breading, helping the egg wash adhere properly.
- Large Eggs (3): Beaten to create an egg wash, which acts as the “glue” for our crispy breadcrumb coating.
- Panko Breadcrumbs (2 cups / 200g): The secret to an exceptionally crispy, light, and airy crust. Panko breadcrumbs are Japanese-style breadcrumbs that are flakier and absorb less oil than traditional breadcrumbs, resulting in a superior crunch.
- Milk or Buttermilk (2 tablespoons): Added to the eggs, this helps to thin the egg wash slightly, allowing for a more even coating and adding a touch of tenderness. Buttermilk also imparts a subtle tang.
- Salt (1.5 teaspoons, divided): Essential for seasoning every layer of the nuggets. We’ll use some for the chicken directly and some in the flour and breadcrumb mixtures.
- Black Pepper (1 teaspoon, divided): Freshly ground black pepper provides a gentle warmth and depth of flavor.
- Garlic Powder (1 teaspoon): Adds a savory, aromatic note that complements chicken beautifully.
- Onion Powder (1 teaspoon): Provides a subtle, sweet, and savory background flavor.
- Paprika (1 teaspoon, smoked or sweet): Adds color and a mild, sweet, or smoky flavor depending on your choice. Smoked paprika is particularly delicious here.
- Cayenne Pepper (¼ teaspoon, optional): For those who like a little kick. Adjust to your preference or omit entirely for a milder nugget.
- Light Olive Oil or Vegetable Oil (for frying, approx. ½ – ¾ cup / 120-180ml): Choose a neutral-flavored oil with a high smoke point if pan-frying. If baking or air frying, you’ll need significantly less, perhaps just a spray or a couple of tablespoons.
Instructions
Follow these steps carefully for perfectly crispy and delicious homemade chicken nuggets:
- Prepare the Chicken:
- Rinse the chicken breasts under cold water and pat them thoroughly dry with paper towels. This is a crucial step as excess moisture will prevent the breading from sticking well and can make the nuggets soggy.
- Place the chicken breasts on a clean cutting board. Using a sharp knife, cut the chicken into uniform, bite-sized pieces, approximately 1 to 1.5 inches square. Uniformity is key for even cooking.
- In a medium bowl, toss the chicken pieces with ½ teaspoon of salt and ¼ teaspoon of black pepper. Set aside to allow the seasoning to permeate the chicken while you prepare the breading station. This initial seasoning of the chicken itself ensures flavor throughout, not just in the coating.
- Set Up the Breading Station:
- You’ll need three shallow dishes or plates.
- Dish 1 (Flour Dredge): In the first dish, combine the all-purpose flour, ½ teaspoon of salt, ¼ teaspoon of black pepper, ½ teaspoon of garlic powder, ½ teaspoon of onion powder, and ½ teaspoon of paprika. Whisk thoroughly to ensure the seasonings are evenly distributed.
- Dish 2 (Egg Wash): In the second dish, crack the eggs and add the milk or buttermilk. Whisk vigorously until the yolks and whites are fully combined and slightly frothy.
- Dish 3 (Breadcrumb Coating): In the third dish, combine the panko breadcrumbs, the remaining ½ teaspoon of salt, ½ teaspoon of black pepper, ½ teaspoon of garlic powder, ½ teaspoon of onion powder, ½ teaspoon of paprika, and the optional cayenne pepper. Mix well to distribute the seasonings evenly throughout the panko. Using your fingers to rub the spices into the panko can also help.
- Bread the Chicken Nuggets:
- Work with a few pieces of chicken at a time to avoid overcrowding your dishes.
- Take a piece of seasoned chicken and dredge it in the seasoned flour mixture (Dish 1), ensuring it’s lightly coated on all sides. Shake off any excess flour. This dry layer helps the egg wash stick.
- Transfer the floured chicken to the egg wash (Dish 2), allowing any excess egg to drip off. Ensure the entire piece is moistened.
- Finally, place the egg-washed chicken into the seasoned panko breadcrumbs (Dish 3). Press the chicken gently into the breadcrumbs to ensure a thick, even coating on all sides. Make sure every nook and cranny is covered for maximum crispiness.
- Place the breaded chicken nuggets in a single layer on a clean plate or baking sheet lined with parchment paper. Do not stack them, as this can cause the breading to become compressed or fall off.
- Repeat this process until all chicken pieces are breaded.
- Optional but Recommended: For an even crispier crust, you can chill the breaded nuggets in the refrigerator for at least 15-30 minutes before cooking. This helps the breading adhere better during the cooking process.
- Cook the Chicken Nuggets: You have a few options here, choose the one that suits you best:
- Pan-Frying (Classic & Crispy):
- Heat the light olive oil or vegetable oil in a large, heavy-bottomed skillet (cast iron works wonderfully) over medium-high heat. You should have about ¼ inch of oil in the pan.
- To test if the oil is ready, drop a pinch of breadcrumbs into it; if they sizzle vigorously, the oil is hot enough. The ideal temperature is around 350°F (175°C).
- Carefully place the breaded chicken nuggets in the hot oil, ensuring not to overcrowd the pan. Cook in batches if necessary. Overcrowding will lower the oil temperature, resulting in soggy, greasy nuggets.
- Fry for about 3-4 minutes per side, or until golden brown, crispy, and the chicken is cooked through. The internal temperature should reach 165°F (74°C) when checked with a meat thermometer.
- Remove the cooked nuggets from the skillet using a slotted spoon and transfer them to a wire rack set over a paper towel-lined baking sheet. Placing them on a wire rack allows air to circulate underneath, keeping the bottoms crispy. Avoid placing them directly on paper towels, as this can make the bottom breading steam and soften.
- If cooking in batches, you can keep the cooked nuggets warm in a preheated oven at 200°F (95°C) while you fry the rest.
- Baking (Healthier Option):
- Preheat your oven to 400°F (200°C).
- Lightly grease a baking sheet with oil or cooking spray, or line it with parchment paper for easy cleanup.
- Arrange the breaded chicken nuggets in a single layer on the prepared baking sheet, ensuring there’s space between them for air circulation.
- For extra crispiness, you can lightly spray the tops of the nuggets with cooking spray or drizzle with a little olive oil.
- Bake for 15-20 minutes, flipping the nuggets halfway through, until they are golden brown, crispy, and the internal temperature reaches 165°F (74°C).
- Air Frying (Crispy with Less Oil):
- Preheat your air fryer to 380°F (195°C).
- Lightly spray the air fryer basket with cooking spray.
- Arrange the breaded chicken nuggets in a single layer in the air fryer basket. Do not overcrowd; cook in batches if necessary.
- Lightly spray the tops of the nuggets with cooking spray.
- Air fry for 10-12 minutes, flipping the nuggets halfway through, until golden brown, crispy, and cooked through to an internal temperature of 165°F (74°C). Cooking time may vary slightly depending on your air fryer model and the size of your nuggets.
- Pan-Frying (Classic & Crispy):
- Rest and Serve:
- Once cooked, let the chicken nuggets rest for a few minutes on the wire rack before serving. This allows the juices to redistribute, resulting in a more tender nugget.
- Serve hot with your favorite dipping sauces.
Nutrition Facts
(Approximate values based on pan-frying, per serving. Assumes recipe makes 4 servings. Actual values may vary based on ingredient brands, exact quantities, and cooking method.)
- Servings: 4
- Calories per serving: Approximately 450-550 kcal (This can be significantly lower if baking or air frying due to less oil absorption.)
- Protein: Approximately 40-45g (Excellent source of lean protein, crucial for muscle repair and growth.)
- Fat: Approximately 20-30g (Primarily from cooking oil if pan-frying; significantly less if baked or air-fried. Choose healthy oils like olive oil.)
- Carbohydrates: Approximately 25-30g (Mainly from the flour and breadcrumbs. Panko contributes to the crispiness.)
- Sodium: Approximately 800-900mg (Can be adjusted by reducing added salt. Still often lower than many commercial options.)
Preparation Time
- Prep Time: 25-35 minutes (This includes cutting the chicken and setting up the breading station. If you’re organized, it can be quicker.)
- Chilling Time (Optional): 15-30 minutes (Helps the breading adhere better.)
- Cook Time: 10-20 minutes (Varies depending on the chosen cooking method – pan-frying is quicker per batch, baking takes longer overall but is more hands-off, air frying is relatively quick.)
- Total Time (excluding optional chilling): Approximately 35-55 minutes. A wonderfully quick meal from start to finish!
How to Serve
Homemade chicken nuggets are incredibly versatile. Here are some fantastic ways to serve them:
- Classic Combo:
- With Fries: The quintessential pairing. Serve with classic shoestring fries, crinkle-cut fries, or even sweet potato fries for a healthier twist.
- Dipping Sauces: A must! Offer a variety:
- Ketchup (a kid-favorite)
- BBQ Sauce (smoky, sweet, or tangy)
- Honey Mustard (sweet and zesty)
- Ranch Dressing (creamy and herby)
- Sweet Chili Sauce (for a bit of sweet heat)
- Homemade Aioli (garlic mayonnaise)
- Spicy Mayo (mayonnaise mixed with sriracha or hot sauce)
- As a Main Course:
- With a Side Salad: Balance the meal with a fresh green salad tossed in a light vinaigrette.
- Steamed or Roasted Vegetables: Broccoli, green beans, carrots, or asparagus make excellent, healthy companions.
- Macaroni and Cheese: A comforting and kid-approved side dish.
- Corn on the Cob: Especially great during summer months.
- In Other Dishes:
- Chicken Nugget Sliders: Serve them in mini slider buns with lettuce, tomato, and a dollop of your favorite sauce.
- Chicken Nugget Wraps: Slice the nuggets and wrap them in a tortilla with shredded lettuce, cheese, diced tomatoes, and ranch or honey mustard.
- On Top of Salads: Add a protein punch to a Caesar salad or a mixed green salad. Slice them for easier eating.
- Lunchbox Hero: Cold or reheated, they make a fantastic addition to school or work lunchboxes, paired with fruit and veggie sticks.
- Party Appetizer:
- Serve them on a platter with a variety of dipping sauces for a crowd-pleasing appetizer at gatherings or game days.
- Provide toothpicks for easy handling.
Additional Tips
To elevate your homemade chicken nugget game, consider these expert tips:
- Don’t Skip the Pat Dry: Excess moisture on the chicken is the enemy of crispy breading. Pat the chicken pieces thoroughly dry with paper towels before seasoning.
- Season Every Layer: Season the chicken itself, the flour, and the panko breadcrumbs. This layering of flavor makes a huge difference in the final taste.
- Double Coat for Extra Crunch (Optional): For an even thicker, crunchier crust, after the first panko coating, dip the nugget back into the egg wash and then back into the panko breadcrumbs for a second layer.
- Maintain Oil Temperature (if frying): If pan-frying, ensure your oil is at the correct temperature (around 350°F/175°C). Too low, and the nuggets absorb too much oil and become greasy. Too high, and the breading burns before the chicken cooks through. Use a thermometer if possible.
- Don’t Overcrowd the Pan/Basket: Whether pan-frying, baking, or air frying, cooking in batches is crucial. Overcrowding lowers the temperature and causes the nuggets to steam rather than crisp.
- Use Panko Breadcrumbs: For the ultimate crispy texture, Panko breadcrumbs are superior to regular fine breadcrumbs. They absorb less oil and create a lighter, flakier crust.
- Make-Ahead and Freezing:
- To Freeze Uncooked: Bread the nuggets as directed, then arrange them in a single layer on a baking sheet and freeze until solid. Transfer to a freezer-safe bag or container. They can be cooked directly from frozen (add a few extra minutes to the cooking time).
- To Freeze Cooked: Allow cooked nuggets to cool completely. Freeze in a single layer on a baking sheet, then transfer to a freezer bag. Reheat in the oven or air fryer for best results.
- Spice It Up or Down: Adjust the seasonings to your liking. Add a pinch more cayenne for heat, or try other spices like dried oregano, thyme, or even a curry powder blend for a different flavor profile. A pinch of celery salt in the breading can also add a nice savory note.
FAQ Section
Here are some frequently asked questions about making homemade chicken nuggets:
- Q: Can I use chicken thighs instead of chicken breasts?
A: Absolutely! Chicken thighs are juicier and more flavorful than breasts due to their higher fat content. Simply trim any excess fat and cut them into bite-sized pieces just like you would with breasts. The cooking time might be slightly longer, so always check for an internal temperature of 165°F (74°C). - Q: How do I make these chicken nuggets gluten-free?
A: It’s easy! Substitute the all-purpose flour with a gluten-free all-purpose flour blend. For the breadcrumbs, use gluten-free panko breadcrumbs or crush gluten-free cornflakes or rice Chex cereal for a crispy coating. Ensure all your seasonings are certified gluten-free. - Q: What’s the best way to store leftover chicken nuggets?
A: Allow the nuggets to cool completely. Store them in an airtight container in the refrigerator for up to 3-4 days. For longer storage, freeze them as described in the “Additional Tips” section. - Q: How do I reheat leftover chicken nuggets so they stay crispy?
A: Avoid the microwave, as it will make them soggy. The best way to reheat nuggets is in an oven or toaster oven preheated to 350-400°F (175-200°C) for about 10-15 minutes, or until heated through and crispy. An air fryer also works wonderfully; reheat at 350°F (175°C) for 3-5 minutes. - Q: Why aren’t my chicken nuggets crispy?
A: Several factors can lead to non-crispy nuggets:- Overcrowding: Not giving the nuggets enough space while cooking causes them to steam.
- Oil Temperature (if frying): Oil that’s not hot enough will result in greasy, soggy nuggets.
- Not Using Panko: Panko breadcrumbs are key for superior crispiness.
- Moisture: The chicken wasn’t patted dry enough, or there was too much liquid in the egg wash.
- Resting on Paper Towels: Placing hot, fried nuggets directly on paper towels can trap steam and make the bottom soggy. Use a wire rack.
- Q: Can I marinate the chicken before breading?
A: Yes, marinating can add extra flavor and tenderness. A simple marinade of buttermilk, pickle juice (for a subtle tang), or yogurt with a pinch of salt and garlic powder for 30 minutes to a few hours can work wonders. Pat the chicken dry thoroughly after marinating and before dredging in flour. - Q: Are these homemade chicken nuggets healthier than fast-food versions?
A: Generally, yes! When you make them at home, you control the ingredients. You can use high-quality chicken, choose healthier cooking oils (or bake/air fry to use less oil), and avoid artificial preservatives, fillers, and excessive sodium often found in fast-food or frozen nuggets. - Q: My breading keeps falling off. What am I doing wrong?
A: This is a common issue. Ensure you follow the three-step breading process correctly: flour, then egg, then breadcrumbs. Press the breadcrumbs firmly onto the chicken. Chilling the breaded nuggets for 15-30 minutes before cooking can also help the coating adhere much better. Also, avoid moving them around too much in the pan during the initial stages of frying. Let one side set before flipping.