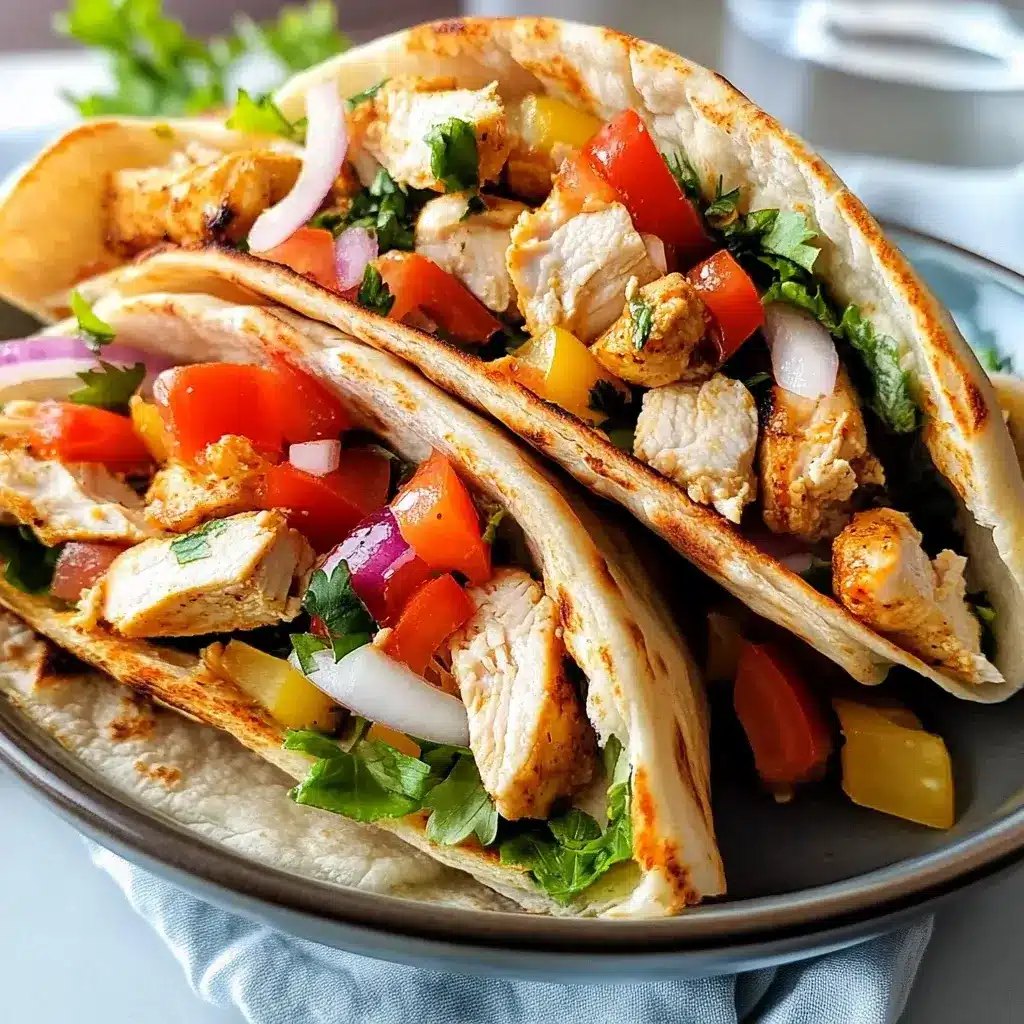
Let me tell you, these Easy Chicken Pita Pockets have become an absolute lifesaver in our household. As a busy parent juggling work, school runs, and the endless cycle of “what’s for dinner?”, finding a recipe that is quick, delicious, and universally loved by the family can feel like discovering a hidden treasure. And this, my friends, is pure gold. The first time I made these, my kids, who can be notoriously picky, devoured them without a single complaint – in fact, they asked for seconds! My partner, equally impressed, remarked on how fresh and flavorful everything tasted, especially considering how little time it took to prepare. The tender, juicy chicken, seasoned to perfection, nestled in a warm, soft pita with crisp, cool vegetables and a creamy, tangy sauce – it’s a symphony of textures and tastes that satisfies on every level. It’s become our go-to for hectic weeknights, a quick and healthy lunch option, and even a casual offering when friends pop over. The simplicity of the ingredients and the straightforward instructions mean I’m not slaving away in the kitchen for hours, yet the result is a meal that feels both wholesome and exciting. If you’re searching for a recipe that will bring smiles to your dinner table without adding stress to your day, then these Easy Chicken Pita Pockets are an absolute must-try.
Ingredients
Here’s what you’ll need to create these delightful and satisfying Easy Chicken Pita Pockets. Each ingredient plays a vital role in building the layers of flavor and texture that make this dish so special.
- For the Chicken Marinade & Chicken:
- 1.5 lbs Boneless, Skinless Chicken Breasts or Thighs: Chicken breasts offer a leaner option, while thighs provide richer flavor and stay more moist. Choose what you prefer, cut into 1-inch cubes for even cooking and easy stuffing.
- 2 Tablespoons Olive Oil: Extra virgin olive oil is preferred for its fruity notes, adding a subtle richness to the marinade and helping the chicken brown beautifully.
- 1 Tablespoon Lemon Juice: Freshly squeezed lemon juice is key here; it tenderizes the chicken and adds a bright, zesty counterpoint to the savory spices.
- 1 Teaspoon Dried Oregano: This classic Mediterranean herb brings a warm, aromatic, and slightly peppery flavor that is quintessential to pita fillings.
- 1 Teaspoon Smoked Paprika: Smoked paprika imparts a deep, smoky flavor and a beautiful reddish hue to the chicken, elevating it beyond plain paprika.
- 1/2 Teaspoon Garlic Powder: A convenient way to add a savory garlic kick that melds well with the other spices.
- 1/2 Teaspoon Onion Powder: Provides a subtle, sweet, and savory onion background note, enhancing the overall umami.
- 1/4 Teaspoon Salt (or to taste): Essential for enhancing all the other flavors in the marinade and the chicken itself.
- 1/4 Teaspoon Black Pepper (or to taste): Freshly ground black pepper adds a touch of pungency and complexity.
- For the Creamy Yogurt Sauce:
- 1 Cup Plain Greek Yogurt (full fat recommended): Greek yogurt provides a thick, creamy base for the sauce. Full fat offers the richest texture and flavor, but low-fat can also be used.
- 1/4 Cup Fresh Dill, finely chopped: Fresh dill lends an unmistakable herbaceous, slightly anise-like freshness that brightens the entire sauce.
- 1 Tablespoon Lemon Juice: More fresh lemon juice to add tang and cut through the richness of the yogurt.
- 1 Small Clove Garlic, minced or grated: A small amount of fresh garlic gives the sauce a pungent, zesty kick. Grating it ensures it disperses evenly.
- Salt and Black Pepper to taste: To season the sauce perfectly to your preference.
- For Assembling the Pita Pockets:
- 4-6 Large Pita Breads (whole wheat or white): Choose good quality, soft pita breads that have a pocket. Whole wheat offers more fiber, while white pitas are often softer.
- 1 Cup Cherry Tomatoes, halved or quartered: These add a burst of sweetness, acidity, and vibrant color.
- 1 Cup Cucumber, diced: English or Persian cucumbers work well; their cool crunch provides a refreshing contrast. No need to peel if using these varieties.
- 1/2 Red Onion, thinly sliced: Adds a sharp, pungent bite and beautiful color. Soaking in cold water for 10 minutes can mellow its flavor if preferred.
- 1/2 Cup Feta Cheese, crumbled (optional): For a salty, tangy, and authentically Mediterranean touch.
- Fresh Lettuce Leaves (e.g., Romaine, Iceberg, or Butter Lettuce): Provides a crisp, fresh base inside the pita and adds another layer of texture.
Instructions
Follow these simple steps to create your delicious Easy Chicken Pita Pockets. This process is designed to be straightforward, ensuring a fantastic meal with minimal fuss.
1. Prepare and Marinate the Chicken (Approx. 5 minutes prep + 20 minutes marinating):
* Cube the Chicken: Pat the chicken breasts or thighs dry with paper towels. This helps the marinade adhere better and promotes browning. Cut the chicken into uniform 1-inch cubes. Uniformity ensures even cooking.
* Combine Marinade Ingredients: In a medium-sized bowl, whisk together the olive oil, lemon juice, dried oregano, smoked paprika, garlic powder, onion powder, salt, and black pepper.
* Marinate: Add the chicken cubes to the marinade, tossing well to ensure every piece is thoroughly coated. Cover the bowl with plastic wrap or a lid.
* Rest: Allow the chicken to marinate at room temperature for at least 20 minutes. If you have more time, you can marinate it in the refrigerator for up to 4 hours. Marinating tenderizes the chicken and infuses it with flavor. (If marinating longer than 30 minutes, do so in the refrigerator and bring to room temperature for 15-20 minutes before cooking).
2. Prepare the Creamy Yogurt Sauce (Approx. 5 minutes):
* Combine Sauce Ingredients: While the chicken is marinating, prepare the sauce. In a small bowl, combine the plain Greek yogurt, chopped fresh dill, lemon juice, and minced/grated garlic.
* Season: Stir well until everything is evenly incorporated. Season with salt and black pepper to your taste.
* Chill (Optional): Cover and refrigerate the sauce until ready to serve. Chilling allows the flavors to meld together even more, resulting in a more cohesive and delicious sauce.
3. Prepare the Vegetables (Approx. 5-7 minutes):
* Chop and Slice: While the chicken marinates and the sauce chills, prepare your fresh vegetables. Wash and dry all produce.
* Halve or quarter the cherry tomatoes.
* Dice the cucumber.
* Thinly slice the red onion. If you prefer a milder onion flavor, you can soak the sliced red onion in a bowl of ice water for about 10 minutes, then drain thoroughly.
* Wash and dry the lettuce leaves. If using larger leaves, you can tear them into smaller, more manageable pieces.
* Crumble Feta (if using): If you’re adding feta cheese, crumble it into small pieces.
* Set Aside: Keep the prepared vegetables in separate bowls or on a platter for easy assembly later.
4. Cook the Chicken (Approx. 8-12 minutes):
* Heat Pan: Place a large skillet or frying pan over medium-high heat. Add a tablespoon of olive oil if your pan tends to stick, though the oil in the marinade might be sufficient. Allow the pan and oil to get hot – the chicken should sizzle upon contact.
* Cook Chicken: Carefully add the marinated chicken cubes to the hot skillet in a single layer. Avoid overcrowding the pan; cook in batches if necessary. Overcrowding will steam the chicken rather than browning it.
* Brown and Cook Through: Cook for about 3-5 minutes per side, or until the chicken is nicely browned and cooked through. The internal temperature should reach 165°F (74°C) when checked with a meat thermometer. The chicken should be opaque all the way through with no pink remaining.
* Rest (Optional but Recommended): Once cooked, remove the chicken from the skillet and let it rest for a few minutes on a clean plate or cutting board. This allows the juices to redistribute, resulting in more tender and flavorful chicken.
5. Warm the Pita Bread (Approx. 2-4 minutes):
* There are several ways to warm your pita bread:
* Oven Method: Preheat your oven to 350°F (175°C). Wrap the pitas in aluminum foil and heat for 5-7 minutes, or until warmed through and pliable.
* Microwave Method: Lightly dampen a paper towel and wrap it around a stack of 2-3 pitas. Microwave on high for 20-30 seconds, or until soft and warm. Be careful not to overheat, as they can become tough.
* Toaster Oven/Toaster: Some wider-slot toasters or toaster ovens can warm pitas directly. Watch carefully to prevent them from becoming too crispy.
* Dry Skillet: Heat a dry skillet over medium heat and warm each pita for about 30 seconds per side.
6. Assemble the Pita Pockets (Approx. 5-10 minutes):
* Prepare Pitas: Once warmed, carefully cut one edge of each pita bread to open up the pocket. If your pitas don’t have a distinct pocket, you can cut them in half to create two half-moon pockets.
* Layer Ingredients: This is where the fun begins!
* Start by spreading a generous spoonful of the creamy yogurt sauce inside each pita pocket.
* Next, add a layer of fresh lettuce.
* Then, fill with a good portion of the cooked chicken.
* Top with the diced cucumbers, cherry tomatoes, and thinly sliced red onions.
* If using, sprinkle crumbled feta cheese over the vegetables.
* Drizzle with a little extra yogurt sauce on top, if desired.
* Serve Immediately: The assembled Easy Chicken Pita Pockets are best enjoyed immediately while the chicken is warm and the vegetables are crisp.
Enjoy your delicious, homemade Easy Chicken Pita Pockets – a perfect blend of flavors and textures!
Nutrition Facts
Understanding the nutritional profile of your meals is an important part of a healthy lifestyle. Here’s an approximate breakdown for these Easy Chicken Pita Pockets:
- Servings: This recipe typically yields 4-6 pita pockets, depending on the size of your pitas and how generously you fill them.
- Calories per Serving (approximate): Around 450-550 calories per pita pocket. This can vary based on the type of chicken (breast vs. thigh), the specific pita bread used, and the amount of sauce and feta cheese.
Key Nutrition Highlights (per serving):
- High in Protein (approx. 30-40g): Primarily from the chicken, protein is crucial for muscle repair and growth, satiety (keeping you feeling full longer), and overall body function. This makes it a very satisfying meal.
- Source of Fiber (approx. 5-8g): Contributed by whole wheat pitas (if used) and fresh vegetables like tomatoes, cucumbers, and onions. Fiber aids in digestion, helps regulate blood sugar levels, and contributes to heart health.
- Contains Healthy Fats (approx. 15-25g): Olive oil provides monounsaturated fats, which are heart-healthy. Greek yogurt, especially if full-fat, also contributes some fats. If you use chicken thighs, the fat content will be slightly higher.
- Rich in Vitamins and Minerals: The fresh vegetables offer a variety of essential vitamins (like Vitamin C from tomatoes and lemon, Vitamin K from lettuce) and minerals. Chicken is a good source of B vitamins, selenium, and phosphorus.
- Controlled Sodium: While salt is used for seasoning, making this dish at home allows you to control the sodium content much better than pre-made or restaurant versions. You can adjust the salt in the marinade and sauce to your preference.
Disclaimer: These are estimated values. Actual nutritional content will vary based on specific ingredient choices, brands, and portion sizes.
Preparation Time
This Easy Chicken Pita Pockets recipe is designed for convenience without sacrificing flavor, making it an ideal choice for busy weeknights or a quick, satisfying lunch.
- Total Estimated Time: Approximately 40-50 minutes
- Preparation Time (Chopping, Marinating Setup): 15-20 minutes. This includes cubing the chicken, mixing the marinade, preparing the yogurt sauce, and chopping the vegetables.
- Marinating Time: Minimum 20 minutes (this can be done while you prep other components or even earlier in the day).
- Cooking Time (Chicken & Warming Pitas): 10-15 minutes. This covers cooking the chicken until golden and tender, and warming the pita breads.
- Assembly Time: 5-10 minutes. This is the final step of filling your delicious pita pockets.
Short Description:
These Easy Chicken Pita Pockets come together in under an hour, with most of the “active” work done in about 25-30 minutes. The marinating time for the chicken is hands-off, allowing you to multitask or simply relax. It’s a wonderfully efficient recipe that delivers a fresh, flavorful, and complete meal with minimal stress, perfect for anyone looking for a quick yet wholesome dining solution.
How to Serve
Serving these Easy Chicken Pita Pockets can be as simple or as elaborate as you like. They are incredibly versatile! Here are some ideas to enhance your dining experience:
- Family-Style Assembly Bar:
- Set out all the components separately: a bowl of cooked chicken, a bowl of yogurt sauce, warmed pitas, and individual bowls for each chopped vegetable (lettuce, tomatoes, cucumbers, red onions) and feta cheese.
- Let everyone build their own pita pocket according to their preferences. This is especially great for families with picky eaters, as they can choose what they like.
- It makes mealtime interactive and fun!
- Plated Meal:
- Assemble each pita pocket just before serving to maintain the crispness of the vegetables and the warmth of the chicken and pita.
- Serve one or two pita pockets per person on a plate.
- Garnish: A light drizzle of extra virgin olive oil over the assembled pita, a sprinkle of fresh parsley or extra dill, or a wedge of lemon on the side can add a nice finishing touch.
- Accompaniments & Side Dishes:
- Simple Salads: A light Greek salad (without the chicken, of course!), a cucumber and tomato salad, or just a bed of mixed greens dressed with lemon vinaigrette.
- Grain Salads: Quinoa salad, couscous salad, or a bulgur wheat salad (tabbouleh) would complement the Mediterranean flavors beautifully.
- Fries or Wedges: For a more indulgent meal, serve with sweet potato fries, regular potato wedges, or even seasoned rice.
- Dips and Spreads: Offer extra yogurt sauce on the side, or consider hummus, baba ghanoush, or tzatziki for dipping or adding into the pitas.
- Olives and Pickles: A small bowl of mixed olives or some pickled vegetables (like pepperoncini or pickled cucumbers) can add a briny, tangy contrast.
- For Different Occasions:
- Quick Weeknight Dinner: Serve as is, with minimal fuss. The focus is on speed and satisfaction.
- Lunchbox Friendly (Deconstructed): Pack the cooked chicken, chopped veggies, and sauce in separate containers. Include a whole pita. The pita can be filled just before eating to prevent sogginess.
- Casual Get-Togethers/Parties: Mini pita pockets can be a great appetizer. Use smaller pita breads or cut regular ones into smaller sections. The “build-your-own” bar concept works exceptionally well here.
- Picnics: Pack components separately as mentioned for lunchboxes. Pitas are very portable!
- Beverage Pairings:
- Refreshing Drinks: Iced tea (especially lemon or mint), lemonade, or sparkling water with a squeeze of lemon or lime.
- Wine: A crisp white wine like Sauvignon Blanc or Pinot Grigio, or a light rosé.
- Beer: A light lager or a pale ale.
No matter how you choose to serve them, these Easy Chicken Pita Pockets are sure to be a hit! Their fresh flavors and satisfying components make them a delightful meal for any setting.
Additional Tips
To help you get the most out of this Easy Chicken Pita Pockets recipe and tailor it to your liking, here are eight additional tips:
- Spice it Up or Down: The current recipe has a mild, savory flavor. If you like more heat, consider adding 1/4 to 1/2 teaspoon of red pepper flakes or a pinch of cayenne pepper to the chicken marinade. Conversely, if you’re sensitive to spice, ensure your smoked paprika isn’t a “hot” variety. You can also offer hot sauce on the side.
- Chicken Variations:
- Ground Chicken: For a different texture, you can use ground chicken. Brown it with the marinade spices in the skillet, breaking it up as it cooks.
- Rotisserie Chicken: For an even quicker version, shred a store-bought rotisserie chicken and toss it with the marinade ingredients (you might need a little extra olive oil or lemon juice to moisten it) or simply season it and skip the cooking step for the chicken.
- Make-Ahead Strategies:
- Chicken: The chicken can be marinated up to 4 hours in advance (refrigerated). Cooked chicken can be stored in an airtight container in the refrigerator for 3-4 days. Reheat gently before serving.
- Sauce: The yogurt sauce can be made up to 2-3 days in advance and stored in an airtight container in the refrigerator. The flavors will actually meld and improve over time.
- Vegetables: Chop vegetables (except perhaps tomatoes, which are best fresh) a day in advance and store them in separate airtight containers in the refrigerator.
- Don’t Overcrowd the Pan: When cooking the chicken, ensure it’s in a single layer in the skillet. If you overcrowd the pan, the chicken will steam rather than sear, and you won’t get those nice browned edges. Cook in batches if necessary. This small step makes a big difference in texture and flavor.
- Pita Bread Perfection:
- Freshness: Use the freshest pita bread you can find. Stale pitas tend to crack and break when you try to open or fill them.
- Warming: Don’t skip warming the pitas. It makes them softer, more pliable, and much more enjoyable. Be careful not to overheat in the microwave, as they can become tough.
- Vegetable Variety: Feel free to customize the vegetable fillings based on your preferences or what’s in season. Other great additions include:
- Shredded carrots
- Bell peppers (red, yellow, or orange), thinly sliced
- Baby spinach leaves
- Kalamata olives, pitted and halved
- Pickled turnips (for a Middle Eastern flair)
- Sauce Alternatives: While the dill yogurt sauce is delicious, you can switch things up:
- Tzatziki: A classic Greek cucumber and yogurt sauce.
- Hummus: Spread a layer of hummus inside the pita before adding other ingredients.
- Tahini Sauce: A creamy sauce made from tahini paste, lemon juice, garlic, and water.
- Spicy Mayo: Mix mayonnaise with sriracha or your favorite hot sauce.
- Leftover Transformation: If you have leftover cooked chicken and vegetables, they can be repurposed!
- Salad Topper: Use the chicken and veggies to create a hearty Mediterranean-style salad.
- Rice Bowl: Serve the chicken and veggies over a bed of cooked rice or quinoa, drizzled with extra sauce.
- Quick Wrap: Use a tortilla instead of pita for a different kind of wrap.
By keeping these tips in mind, you can ensure your Easy Chicken Pita Pockets are always a delicious and exciting meal!
FAQ Section
Here are answers to some frequently asked questions about making Easy Chicken Pita Pockets:
1. Can I use a different type of meat or make it vegetarian?
* Answer: Absolutely! For different meats, lamb cubes or ground lamb seasoned similarly would be delicious for a more traditional gyro-style flavor. Beef strips (like sirloin) would also work well. For a vegetarian version, consider using firm or extra-firm tofu (pressed and cubed, then marinated and pan-fried or baked), chickpeas (seasoned and roasted), or grilled halloumi cheese. Falafel is another excellent vegetarian filling for pita pockets.
2. My pita bread always tears when I try to open it. Any tips?
* Answer: This is a common issue! Firstly, ensure your pita bread is fresh; older pitas are drier and more prone to tearing. Secondly, proper warming is key. Gentle warming (as described in the instructions – oven, microwave with a damp paper towel, or skillet) makes the bread more pliable. Avoid overheating, which can make it brittle. When cutting, use a sharp knife and make a slit along about one-third of the edge, then gently pry it open with your fingers or the handle of a spoon. If it still tears, you can always cut the pitas in half and make half-moon pockets.
3. How can I make this recipe gluten-free?
* Answer: The main source of gluten here is the pita bread. Look for gluten-free pita breads, which are increasingly available in most supermarkets or specialty health food stores. Alternatively, you can serve the chicken filling and vegetables over a bed of lettuce (as a salad), with rice, or with gluten-free crackers. Ensure your spices (like garlic/onion powder) are certified gluten-free if you have celiac disease.
4. The yogurt sauce seems a bit thick/thin. How can I adjust it?
* Answer: The thickness of Greek yogurt can vary by brand. If your sauce is too thick, you can thin it out by adding a little more lemon juice, a teaspoon or two of water, or even a splash of milk until it reaches your desired consistency. If it’s too thin (perhaps you used regular plain yogurt instead of Greek), you can try stirring in a bit more Greek yogurt if you have it, or let it sit for a while as sometimes it thickens slightly upon standing. For future reference, using full-fat Greek yogurt generally yields the creamiest, thickest sauce.
5. Is this recipe kid-friendly?
* Answer: Yes, generally it’s very kid-friendly! The chicken is savory but not overly spicy. The “build-your-own” serving style (mentioned in “How to Serve”) is particularly great for kids, as they can choose which vegetables they want and how much sauce. If your children are sensitive to onion, you can omit the red onion from their pitas or soak it in cold water to mellow the flavor. You can also serve their chicken with milder accompaniments if they prefer.
6. How long will the leftovers keep?
* Answer: It’s best to store the components separately. Cooked chicken can be kept in an airtight container in the refrigerator for 3-4 days. The yogurt sauce will also last for 3-4 days. Chopped vegetables are best eaten within 1-2 days for maximum freshness, though heartier ones like cucumbers and onions can last a bit longer. Assembled pita pockets are best eaten immediately, as they can become soggy if stored.
7. Can I grill the chicken instead of pan-frying it?
* Answer: Yes, grilling the chicken is a fantastic option and will add a lovely smoky flavor! If using chicken cubes, thread them onto skewers (soak wooden skewers in water for 30 minutes beforehand to prevent burning). Grill over medium-high heat for about 8-12 minutes, turning occasionally, until cooked through and nicely charred. If using whole chicken breasts or thighs, grill them and then slice or cube them after resting.
8. What if I don’t have fresh dill for the sauce?
* Answer: While fresh dill offers the best flavor, you can substitute it with dried dill. Use about 1-1.5 teaspoons of dried dill for every tablespoon of fresh dill called for in the recipe. Allow the sauce to sit for at least 15-20 minutes after mixing if using dried herbs, as this gives them time to rehydrate and release their flavor. Other fresh herbs like fresh parsley or mint could also be used for a different flavor profile, or a combination.

Easy Chicken Pita Pockets
Ingredients
Here’s what you’ll need to create these delightful and satisfying Easy Chicken Pita Pockets. Each ingredient plays a vital role in building the layers of flavor and texture that make this dish so special.
- For the Chicken Marinade & Chicken:
- 1.5 lbs Boneless, Skinless Chicken Breasts or Thighs: Chicken breasts offer a leaner option, while thighs provide richer flavor and stay more moist. Choose what you prefer, cut into 1-inch cubes for even cooking and easy stuffing.
- 2 Tablespoons Olive Oil: Extra virgin olive oil is preferred for its fruity notes, adding a subtle richness to the marinade and helping the chicken brown beautifully.
- 1 Tablespoon Lemon Juice: Freshly squeezed lemon juice is key here; it tenderizes the chicken and adds a bright, zesty counterpoint to the savory spices.
- 1 Teaspoon Dried Oregano: This classic Mediterranean herb brings a warm, aromatic, and slightly peppery flavor that is quintessential to pita fillings.
- 1 Teaspoon Smoked Paprika: Smoked paprika imparts a deep, smoky flavor and a beautiful reddish hue to the chicken, elevating it beyond plain paprika.
- 1/2 Teaspoon Garlic Powder: A convenient way to add a savory garlic kick that melds well with the other spices.
- 1/2 Teaspoon Onion Powder: Provides a subtle, sweet, and savory onion background note, enhancing the overall umami.
- 1/4 Teaspoon Salt (or to taste): Essential for enhancing all the other flavors in the marinade and the chicken itself.
- 1/4 Teaspoon Black Pepper (or to taste): Freshly ground black pepper adds a touch of pungency and complexity.
- For the Creamy Yogurt Sauce:
- 1 Cup Plain Greek Yogurt (full fat recommended): Greek yogurt provides a thick, creamy base for the sauce. Full fat offers the richest texture and flavor, but low-fat can also be used.
- 1/4 Cup Fresh Dill, finely chopped: Fresh dill lends an unmistakable herbaceous, slightly anise-like freshness that brightens the entire sauce.
- 1 Tablespoon Lemon Juice: More fresh lemon juice to add tang and cut through the richness of the yogurt.
- 1 Small Clove Garlic, minced or grated: A small amount of fresh garlic gives the sauce a pungent, zesty kick. Grating it ensures it disperses evenly.
- Salt and Black Pepper to taste: To season the sauce perfectly to your preference.
- For Assembling the Pita Pockets:
- 4–6 Large Pita Breads (whole wheat or white): Choose good quality, soft pita breads that have a pocket. Whole wheat offers more fiber, while white pitas are often softer.
- 1 Cup Cherry Tomatoes, halved or quartered: These add a burst of sweetness, acidity, and vibrant color.
- 1 Cup Cucumber, diced: English or Persian cucumbers work well; their cool crunch provides a refreshing contrast. No need to peel if using these varieties.
- 1/2 Red Onion, thinly sliced: Adds a sharp, pungent bite and beautiful color. Soaking in cold water for 10 minutes can mellow its flavor if preferred.
- 1/2 Cup Feta Cheese, crumbled (optional): For a salty, tangy, and authentically Mediterranean touch.
- Fresh Lettuce Leaves (e.g., Romaine, Iceberg, or Butter Lettuce): Provides a crisp, fresh base inside the pita and adds another layer of texture.
Instructions
Follow these simple steps to create your delicious Easy Chicken Pita Pockets. This process is designed to be straightforward, ensuring a fantastic meal with minimal fuss.
1. Prepare and Marinate the Chicken (Approx. 5 minutes prep + 20 minutes marinating):
* Cube the Chicken: Pat the chicken breasts or thighs dry with paper towels. This helps the marinade adhere better and promotes browning. Cut the chicken into uniform 1-inch cubes. Uniformity ensures even cooking.
* Combine Marinade Ingredients: In a medium-sized bowl, whisk together the olive oil, lemon juice, dried oregano, smoked paprika, garlic powder, onion powder, salt, and black pepper.
* Marinate: Add the chicken cubes to the marinade, tossing well to ensure every piece is thoroughly coated. Cover the bowl with plastic wrap or a lid.
* Rest: Allow the chicken to marinate at room temperature for at least 20 minutes. If you have more time, you can marinate it in the refrigerator for up to 4 hours. Marinating tenderizes the chicken and infuses it with flavor. (If marinating longer than 30 minutes, do so in the refrigerator and bring to room temperature for 15-20 minutes before cooking).
2. Prepare the Creamy Yogurt Sauce (Approx. 5 minutes):
* Combine Sauce Ingredients: While the chicken is marinating, prepare the sauce. In a small bowl, combine the plain Greek yogurt, chopped fresh dill, lemon juice, and minced/grated garlic.
* Season: Stir well until everything is evenly incorporated. Season with salt and black pepper to your taste.
* Chill (Optional): Cover and refrigerate the sauce until ready to serve. Chilling allows the flavors to meld together even more, resulting in a more cohesive and delicious sauce.
3. Prepare the Vegetables (Approx. 5-7 minutes):
* Chop and Slice: While the chicken marinates and the sauce chills, prepare your fresh vegetables. Wash and dry all produce.
* Halve or quarter the cherry tomatoes.
* Dice the cucumber.
* Thinly slice the red onion. If you prefer a milder onion flavor, you can soak the sliced red onion in a bowl of ice water for about 10 minutes, then drain thoroughly.
* Wash and dry the lettuce leaves. If using larger leaves, you can tear them into smaller, more manageable pieces.
* Crumble Feta (if using): If you’re adding feta cheese, crumble it into small pieces.
* Set Aside: Keep the prepared vegetables in separate bowls or on a platter for easy assembly later.
4. Cook the Chicken (Approx. 8-12 minutes):
* Heat Pan: Place a large skillet or frying pan over medium-high heat. Add a tablespoon of olive oil if your pan tends to stick, though the oil in the marinade might be sufficient. Allow the pan and oil to get hot – the chicken should sizzle upon contact.
* Cook Chicken: Carefully add the marinated chicken cubes to the hot skillet in a single layer. Avoid overcrowding the pan; cook in batches if necessary. Overcrowding will steam the chicken rather than browning it.
* Brown and Cook Through: Cook for about 3-5 minutes per side, or until the chicken is nicely browned and cooked through. The internal temperature should reach 165°F (74°C) when checked with a meat thermometer. The chicken should be opaque all the way through with no pink remaining.
* Rest (Optional but Recommended): Once cooked, remove the chicken from the skillet and let it rest for a few minutes on a clean plate or cutting board. This allows the juices to redistribute, resulting in more tender and flavorful chicken.
5. Warm the Pita Bread (Approx. 2-4 minutes):
* There are several ways to warm your pita bread:
* Oven Method: Preheat your oven to 350°F (175°C). Wrap the pitas in aluminum foil and heat for 5-7 minutes, or until warmed through and pliable.
* Microwave Method: Lightly dampen a paper towel and wrap it around a stack of 2-3 pitas. Microwave on high for 20-30 seconds, or until soft and warm. Be careful not to overheat, as they can become tough.
* Toaster Oven/Toaster: Some wider-slot toasters or toaster ovens can warm pitas directly. Watch carefully to prevent them from becoming too crispy.
* Dry Skillet: Heat a dry skillet over medium heat and warm each pita for about 30 seconds per side.
6. Assemble the Pita Pockets (Approx. 5-10 minutes):
* Prepare Pitas: Once warmed, carefully cut one edge of each pita bread to open up the pocket. If your pitas don’t have a distinct pocket, you can cut them in half to create two half-moon pockets.
* Layer Ingredients: This is where the fun begins!
* Start by spreading a generous spoonful of the creamy yogurt sauce inside each pita pocket.
* Next, add a layer of fresh lettuce.
* Then, fill with a good portion of the cooked chicken.
* Top with the diced cucumbers, cherry tomatoes, and thinly sliced red onions.
* If using, sprinkle crumbled feta cheese over the vegetables.
* Drizzle with a little extra yogurt sauce on top, if desired.
* Serve Immediately: The assembled Easy Chicken Pita Pockets are best enjoyed immediately while the chicken is warm and the vegetables are crisp.
Enjoy your delicious, homemade Easy Chicken Pita Pockets – a perfect blend of flavors and textures!
Nutrition
- Serving Size: one normal portion
- Calories: 550
- Fat: 25g
- Fiber: 8g
- Protein: 40g