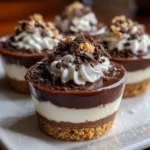

There are certain recipes that become legends within a family, the ones requested for every birthday, holiday, and special occasion. In my house, this Creamy Chocolate Layer Cups recipe is that legend. I still remember the first time I made them. I was looking for a simple, no-bake dessert for a last-minute get-together, something that looked impressive without requiring hours of oven time. I stumbled upon the concept of layered pudding desserts and decided to create my own version. The result was nothing short of spectacular. When I brought them out, the room went quiet, followed by a chorus of “oohs” and “aahs.” Each spoonful was a journey through textures and flavors: a crunchy, chocolatey cookie base, a tangy and sweet cream cheese layer that melts in your mouth, a deep and rich chocolate pudding center, and a cloud-like whipped topping to finish it all off. My kids now call them “magic chocolate cups,” and my husband, who isn’t even a huge dessert person, will always find room for one. They have become my go-to secret weapon for potlucks and parties because they can be made ahead, look like they came from a fancy bakery, and are universally adored. This recipe isn’t just a set of instructions; it’s a guaranteed way to bring smiles to the faces of those you love. Prepare to become the designated dessert-bringer for life, because once you share these, everyone will be asking for the recipe.
Ingredients
Here is everything you will need to assemble these decadent and irresistible chocolate cups. Each component plays a crucial role in building the perfect balance of flavor and texture.
- 1 (14.3 oz) package of chocolate sandwich cookies (like Oreos): These form the crunchy, flavorful foundation of our dessert. The combination of the dark chocolate cookie and the cream filling creates a complex base that requires no additional sugar. You’ll need the entire cookie, filling and all.
- 6 tablespoons unsalted butter, melted: This is the binder for our cookie crust. Melted butter mixes with the cookie crumbs to create a firm, sliceable base that holds its shape perfectly in each cup.
- 1 (8 oz) package full-fat block cream cheese, softened to room temperature: This is the star of the second layer. Using full-fat, block-style cream cheese is essential for a thick, creamy, and tangy layer that doesn’t become watery. Softening it is crucial for a smooth, lump-free consistency.
- 1 cup powdered sugar (confectioners’ sugar): This fine sugar dissolves instantly into the cream cheese, providing sweetness without any gritty texture, resulting in a silky-smooth filling.
- 1 (8 oz) container frozen whipped topping (like Cool Whip), thawed, divided: This light and airy topping is used in both the cream cheese layer and as the final garnish. Its stability makes it perfect for creating distinct, fluffy layers that hold up well in the refrigerator.
- 2 (3.9 oz) packages of instant chocolate pudding mix: This is the heart of the chocolate flavor. Using instant pudding makes the process incredibly fast and foolproof, delivering a rich, decadent chocolate layer without any cooking.
- 3 cups cold whole milk: Whole milk is the ideal choice for making the instant pudding. Its higher fat content results in a richer, creamier, and more firmly set pudding layer compared to lower-fat milk options.
- Chocolate shavings or mini chocolate chips for garnish (optional): A final flourish that adds a touch of elegance and an extra bit of chocolate texture to the finished dessert.
Instructions
Follow these step-by-step instructions carefully to achieve perfectly distinct and delicious layers. The process is simple, but attention to detail will ensure dessert perfection.
- Prepare the Serving Cups: Select 8-10 individual serving glasses, small mason jars, or ramekins. Having them ready will make the assembly process smooth and efficient. Clear glasses are highly recommended as they beautifully showcase the distinct layers of the dessert.
- Make the Chocolate Cookie Crust: Place the entire package of chocolate sandwich cookies (do not remove the filling) into the bowl of a food processor. Pulse until they are broken down into fine crumbs. If you don’t have a food processor, you can place the cookies in a large, sealed zip-top bag and crush them with a rolling pin or a heavy can. Transfer the fine crumbs to a medium bowl. Pour the 6 tablespoons of melted unsalted butter over the crumbs and mix with a fork until all the crumbs are evenly moistened and resemble wet sand.
- Form the Crust Layer: Spoon approximately 2-3 tablespoons of the cookie crumb mixture into the bottom of each serving cup. Use the back of a spoon or a small, flat-bottomed glass to press the crumbs down firmly and evenly. This creates a solid base for the subsequent layers. Place the cups in the refrigerator to chill and set while you prepare the next layer.
- Create the Cream Cheese Layer: In a large mixing bowl, place the softened block of cream cheese. It is vital that the cream cheese is at room temperature to avoid lumps. Using an electric hand mixer or a stand mixer with the paddle attachment, beat the cream cheese on medium speed for about 1-2 minutes until it is completely smooth and creamy. Scrape down the sides of the bowl. Add the 1 cup of powdered sugar and beat on low speed until combined, then increase to medium speed and beat until the mixture is light and fluffy, about another minute. Gently fold in 1 cup of the thawed whipped topping using a spatula. Mix until just combined; be careful not to overmix, as this can deflate the whipped topping.
- Assemble the Second Layer: Remove the cups from the refrigerator. Carefully spoon the cream cheese mixture evenly over the chilled cookie crusts. Use a small spatula or the back of a spoon to spread the layer gently and evenly, trying to create a flat surface without disturbing the crust below.
- Prepare the Chocolate Pudding Layer: In a separate large bowl, whisk together the two packages of instant chocolate pudding mix and the 3 cups of cold whole milk. It’s important to use very cold milk for the best results. Whisk vigorously for about 2 minutes, until the pudding begins to thicken and there are no dry lumps remaining. The mixture will become noticeably thick and smooth.
- Assemble the Third Layer: Immediately spoon the prepared chocolate pudding over the cream cheese layer in each cup. Work quickly, as the pudding will continue to set. Spread it gently into an even layer, ensuring it reaches the edges of the glass.
- Chill for Final Setting: Place the assembled dessert cups in the refrigerator and chill for at least 4 hours, or preferably overnight. This chilling time is not optional; it is crucial for all the layers to fully set and for the flavors to meld together. A well-chilled dessert will have firm, distinct layers that are easy to scoop.
- Garnish and Serve: Just before serving, top each chocolate cup with a generous dollop of the remaining thawed whipped topping. If desired, sprinkle with chocolate shavings, mini chocolate chips, or a dusting of cocoa powder for an elegant finishing touch.
Nutrition Facts
Please note that these values are an approximation and can vary based on the specific brands of ingredients used and the exact serving size.
- Servings: 8-10 individual cups
- Calories per serving: Approximately 550-650 kcal
- Fat: This dessert is rich and decadent, primarily due to the butter, full-fat cream cheese, and whole milk, which contribute to its creamy texture.
- Carbohydrates: The main source of carbohydrates comes from the cookie crust and the sugars in the pudding and cream cheese layers, providing energy and sweetness.
- Sugar: This is a sweet treat, with sugar present in the cookies, powdered sugar, pudding mix, and whipped topping.
- Protein: A moderate amount of protein is provided by the milk and cream cheese in the recipe.
Preparation Time
This recipe is prized for its simplicity and reliance on chilling rather than active cooking. The total time is mostly hands-off, making it a perfect make-ahead dessert.
- Active Preparation Time: Approximately 20-25 minutes. This includes crushing the cookies, mixing the layers, and assembling the cups.
- Chilling Time: A minimum of 4 hours, but overnight (8-12 hours) is highly recommended for the best texture and flavor.
How to Serve
Presentation elevates this simple dessert from a tasty treat to a show-stopping centerpiece. Here are some creative ways to serve your Creamy Chocolate Layer Cups:
- Vessel Variety:
- Classic Glass Tumblers: Short, clear glass tumblers are perfect for showcasing the beautiful, distinct layers.
- Elegant Wine Glasses: For a fancier occasion, serving these in stemmed wine glasses or martini glasses adds a touch of sophistication.
- Rustic Mason Jars: Small 4-ounce or 8-ounce mason jars are great for a rustic, casual feel, perfect for picnics or potlucks. They also come with lids, making them easily transportable.
- Individual Ramekins: White or colored ceramic ramekins offer a classic presentation, hiding the layers for a surprise with the first spoonful.
- Topping Extravaganza: While the classic whipped topping and chocolate shavings are perfect, you can create a “topping bar” to let guests customize their cups.
- Fresh Berries: A few fresh raspberries, sliced strawberries, or blueberries on top add a pop of color and a tartness that cuts through the richness.
- Sauce Drizzles: A drizzle of warm caramel sauce, hot fudge, or even raspberry coulis over the top takes it to another level.
- Crunchy Elements: Sprinkle on some chopped nuts (like pecans or almonds), toffee bits, or crushed chocolate sandwich cookies for extra texture.
- A Touch of Green: A single fresh mint leaf placed on the whipped topping provides a beautiful color contrast and a hint of freshness.
- Occasion-Specific Serving:
- For a Party: Arrange the finished cups on a tiered dessert stand to create an impressive display.
- For a Cozy Night In: Serve them straight from the fridge for a simple, comforting, and utterly satisfying end to a meal.
- As a Single Trifle: If you don’t want to make individual portions, you can layer the entire recipe in a large glass trifle bowl for a stunning family-style dessert.
Additional Tips
Master this recipe and make it your own with these eight expert tips for guaranteed success and delicious variations.
- Room Temperature Ingredients are Non-Negotiable: For the cream cheese layer, “softened to room temperature” is the most important instruction. Cold cream cheese will not blend smoothly with the sugar and will result in a lumpy, unpleasant texture. Take it out of the fridge at least 1-2 hours before you begin.
- Achieve Perfectly Clean Layers: To get those sharp, distinct lines you see in bakeries, use a piping bag. Spoon the cream cheese and pudding layers into separate large piping bags (or large zip-top bags with a corner snipped off). This allows you to pipe the fillings neatly into the cups without smearing them on the sides of the glass.
- Don’t Rush the Chill: Patience is a virtue, especially with this recipe. The 4-hour minimum chilling time is crucial for the pudding to set completely and for the cream cheese layer to firm up. Rushing this step will result in soupy, messy layers. Chilling overnight yields the best possible texture and allows the flavors to deepen.
- The Make-Ahead Marvel: This dessert is a host’s best friend. You can fully assemble the cups (without the final whipped topping and garnish) up to 48 hours in advance. Simply cover them tightly with plastic wrap and keep them refrigerated. Add the final toppings just before serving to keep them looking fresh.
- Crust Customization: While chocolate sandwich cookies are classic, feel free to experiment with the crust. Graham crackers, Biscoff cookies, or even vanilla wafers make excellent alternatives. Simply substitute an equal weight and follow the same instructions with melted butter.
- Deepen the Chocolate Flavor: For the true chocoholics, you can intensify the chocolate layer. Add one tablespoon of unsweetened cocoa powder or one teaspoon of instant espresso powder to the chocolate pudding mix before adding the milk. The coffee won’t make it taste like mocha but will amplify the deep chocolate notes.
- Homemade Whipped Cream vs. Topping: While frozen whipped topping offers stability, you can absolutely substitute it with homemade sweetened whipped cream. To do so, whip 1 ½ cups of heavy whipping cream with ¼ cup of powdered sugar and 1 teaspoon of vanilla extract until stiff peaks form. Note that homemade cream may not hold its shape as long, so it’s best for desserts being served the same day.
- Mind the Milk Temperature: For the instant pudding layer, using very cold milk is key. Cold milk helps the pudding set faster and thicker. I sometimes place my measuring cup with the milk in the freezer for 10-15 minutes before mixing to ensure it’s ice cold.
FAQ Section
Here are answers to some of the most frequently asked questions about making Creamy Chocolate Layer Cups.
1. Can I make this recipe in one large dish instead of individual cups?
Absolutely! This recipe works beautifully as a single dessert in an 8×8-inch or 9×9-inch square baking dish, or in a large glass trifle bowl. Simply press the crust into the bottom of the dish and spread the layers evenly on top. To serve, cut it into squares or scoop it out with a large spoon.
2. My cream cheese layer was lumpy. What went wrong?
The most common culprit for a lumpy cream cheese layer is that the cream cheese was too cold. Even slightly cool cream cheese will not beat smoothly. It must be at true room temperature. Another possibility is not beating the cream cheese by itself first before adding the other ingredients.
3. How long will these dessert cups last in the refrigerator?
When covered properly with plastic wrap, these cups will stay fresh and delicious for up to 3-4 days in the refrigerator. The cookie crust will soften slightly over time, but the flavors will remain fantastic. It’s best to add the final whipped topping and garnishes just before serving.
4. Can I freeze these chocolate layer cups?
While you can technically freeze them, the texture may change upon thawing. The pudding and cream cheese layers can sometimes become watery or separate slightly. If you do choose to freeze them, do so without the top layer of whipped cream. Thaw them in the refrigerator for several hours before serving and then add the topping.
5. Can I use a different flavor of pudding?
Yes, this recipe is very versatile! Feel free to substitute the chocolate pudding with other instant pudding flavors. Vanilla, cheesecake, or butterscotch pudding would all be delicious and create a completely new dessert experience with the same easy method.
6. Is it possible to make this recipe gluten-free?
Yes, making a gluten-free version is quite simple. Just substitute the regular chocolate sandwich cookies with your favorite brand of gluten-free chocolate sandwich cookies. Ensure your instant pudding mix is also certified gluten-free, as some brands can contain modified food starches derived from wheat.
7. Why didn’t my layers stay separate and distinct?
This usually happens for one of two reasons. First, the pudding layer may not have been thick enough when you added it. Be sure to whisk it for the full 2 minutes until it’s noticeably thick. Second, you may have spread the layers too aggressively. Be gentle when spreading each layer, especially the pudding, so it doesn’t mix with the cream cheese layer below. Chilling the crust and cream cheese layers before adding the next one also helps.
8. Do I have to use instant pudding? Can I use a cook-and-serve pudding mix?
Instant pudding is highly recommended for its ease and no-cook convenience. If you only have cook-and-serve pudding, you can use it, but you will need to prepare it on the stovetop according to its package directions. The key is that you must allow the cooked pudding to cool completely to room temperature before layering it, or it will melt the cream cheese layer. You may want to place plastic wrap directly on the surface of the pudding as it cools to prevent a skin from forming.

Creamy Chocolate Layer Cups Recipe
Ingredients
Here is everything you will need to assemble these decadent and irresistible chocolate cups. Each component plays a crucial role in building the perfect balance of flavor and texture.
- 1 (14.3 oz) package of chocolate sandwich cookies (like Oreos): These form the crunchy, flavorful foundation of our dessert. The combination of the dark chocolate cookie and the cream filling creates a complex base that requires no additional sugar. You’ll need the entire cookie, filling and all.
- 6 tablespoons unsalted butter, melted: This is the binder for our cookie crust. Melted butter mixes with the cookie crumbs to create a firm, sliceable base that holds its shape perfectly in each cup.
- 1 (8 oz) package full-fat block cream cheese, softened to room temperature: This is the star of the second layer. Using full-fat, block-style cream cheese is essential for a thick, creamy, and tangy layer that doesn’t become watery. Softening it is crucial for a smooth, lump-free consistency.
- 1 cup powdered sugar (confectioners’ sugar): This fine sugar dissolves instantly into the cream cheese, providing sweetness without any gritty texture, resulting in a silky-smooth filling.
- 1 (8 oz) container frozen whipped topping (like Cool Whip), thawed, divided: This light and airy topping is used in both the cream cheese layer and as the final garnish. Its stability makes it perfect for creating distinct, fluffy layers that hold up well in the refrigerator.
- 2 (3.9 oz) packages of instant chocolate pudding mix: This is the heart of the chocolate flavor. Using instant pudding makes the process incredibly fast and foolproof, delivering a rich, decadent chocolate layer without any cooking.
- 3 cups cold whole milk: Whole milk is the ideal choice for making the instant pudding. Its higher fat content results in a richer, creamier, and more firmly set pudding layer compared to lower-fat milk options.
- Chocolate shavings or mini chocolate chips for garnish (optional): A final flourish that adds a touch of elegance and an extra bit of chocolate texture to the finished dessert.
Instructions
Follow these step-by-step instructions carefully to achieve perfectly distinct and delicious layers. The process is simple, but attention to detail will ensure dessert perfection.
- Prepare the Serving Cups: Select 8-10 individual serving glasses, small mason jars, or ramekins. Having them ready will make the assembly process smooth and efficient. Clear glasses are highly recommended as they beautifully showcase the distinct layers of the dessert.
- Make the Chocolate Cookie Crust: Place the entire package of chocolate sandwich cookies (do not remove the filling) into the bowl of a food processor. Pulse until they are broken down into fine crumbs. If you don’t have a food processor, you can place the cookies in a large, sealed zip-top bag and crush them with a rolling pin or a heavy can. Transfer the fine crumbs to a medium bowl. Pour the 6 tablespoons of melted unsalted butter over the crumbs and mix with a fork until all the crumbs are evenly moistened and resemble wet sand.
- Form the Crust Layer: Spoon approximately 2-3 tablespoons of the cookie crumb mixture into the bottom of each serving cup. Use the back of a spoon or a small, flat-bottomed glass to press the crumbs down firmly and evenly. This creates a solid base for the subsequent layers. Place the cups in the refrigerator to chill and set while you prepare the next layer.
- Create the Cream Cheese Layer: In a large mixing bowl, place the softened block of cream cheese. It is vital that the cream cheese is at room temperature to avoid lumps. Using an electric hand mixer or a stand mixer with the paddle attachment, beat the cream cheese on medium speed for about 1-2 minutes until it is completely smooth and creamy. Scrape down the sides of the bowl. Add the 1 cup of powdered sugar and beat on low speed until combined, then increase to medium speed and beat until the mixture is light and fluffy, about another minute. Gently fold in 1 cup of the thawed whipped topping using a spatula. Mix until just combined; be careful not to overmix, as this can deflate the whipped topping.
- Assemble the Second Layer: Remove the cups from the refrigerator. Carefully spoon the cream cheese mixture evenly over the chilled cookie crusts. Use a small spatula or the back of a spoon to spread the layer gently and evenly, trying to create a flat surface without disturbing the crust below.
- Prepare the Chocolate Pudding Layer: In a separate large bowl, whisk together the two packages of instant chocolate pudding mix and the 3 cups of cold whole milk. It’s important to use very cold milk for the best results. Whisk vigorously for about 2 minutes, until the pudding begins to thicken and there are no dry lumps remaining. The mixture will become noticeably thick and smooth.
- Assemble the Third Layer: Immediately spoon the prepared chocolate pudding over the cream cheese layer in each cup. Work quickly, as the pudding will continue to set. Spread it gently into an even layer, ensuring it reaches the edges of the glass.
- Chill for Final Setting: Place the assembled dessert cups in the refrigerator and chill for at least 4 hours, or preferably overnight. This chilling time is not optional; it is crucial for all the layers to fully set and for the flavors to meld together. A well-chilled dessert will have firm, distinct layers that are easy to scoop.
- Garnish and Serve: Just before serving, top each chocolate cup with a generous dollop of the remaining thawed whipped topping. If desired, sprinkle with chocolate shavings, mini chocolate chips, or a dusting of cocoa powder for an elegant finishing touch.
Nutrition
- Serving Size: one normal portion
- Calories: 650