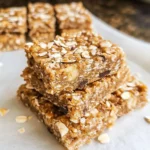

I still remember the first time I whipped up a batch of these Coconut Banana Energy Bars. The kids had been on a “store-bought granola bar” kick, and frankly, I was getting a little concerned about the sugar content and the long list of unpronounceable ingredients. I wanted something wholesome, packed with natural goodness, that would give them sustained energy for their after-school activities, and frankly, give me a boost during that notorious mid-afternoon slump. When these came out of the fridge, perfectly set and smelling divine, I knew I was onto a winner. The first bite was a revelation – chewy, naturally sweet from the bananas, with a delightful tropical hint from the coconut and a satisfying texture from the oats. My eldest, usually a harsh critic of “mom-made health food,” devoured two in a row and asked if he could take them in his lunchbox. My partner, who often reaches for a sugary snack post-workout, found these to be the perfect, guilt-free refuel. Since then, these Coconut Banana Energy Bars have become a staple in our household. They’re ridiculously easy to make, incredibly versatile, and just so darn delicious. They’re the perfect answer to “I’m hungry!” and a fantastic way to use up those ripe bananas that are always lounging on the counter.
Ingredients
- 2 cups (180g) Rolled Oats (Old-Fashioned Oats): These form the hearty, fiber-rich base of our energy bars, providing sustained energy release. Do not use instant oats, as they will result in a mushier texture.
- 1 cup (80g) Unsweetened Shredded Coconut: This adds a delightful tropical flavor and chewy texture. Toasting it beforehand can enhance the nutty notes.
- ½ cup (120g) Creamy Nut Butter: Almond butter, peanut butter, or cashew butter work wonderfully. This acts as a binder and adds healthy fats and protein. For a nut-free version, sunflower seed butter is a great alternative.
- 2 medium Ripe Bananas (about 1 cup mashed): The riper the banana, the sweeter your bars will be. They are a key natural sweetener and binder.
- ¼ cup (60ml) Maple Syrup or Honey: This adds a touch more sweetness and helps bind the ingredients. For a vegan option, ensure you use maple syrup. Adjust to your preferred sweetness level.
- 1 teaspoon Vanilla Extract: Enhances all the other flavors in the bars, adding a warm, comforting aroma.
- ½ teaspoon Ground Cinnamon (optional): Adds a warm, spicy note that complements the banana and coconut beautifully.
- ¼ teaspoon Salt: Balances the sweetness and brings out the flavors of the other ingredients.
- ½ cup (85g) Optional Add-ins: Such as mini chocolate chips (dark, semi-sweet, or milk), chopped nuts (walnuts, pecans, almonds), seeds (chia, flax, pumpkin, sunflower), or dried fruit (raisins, cranberries, chopped apricots).
Instructions
- Prepare the Pan: Line an 8×8 inch (20×20 cm) square baking pan with parchment paper, leaving some overhang on two sides. This will make it easier to lift the bars out once they’re set. Lightly grease the parchment paper if it’s not non-stick.
- Mash the Bananas: In a large mixing bowl, peel and mash the ripe bananas with a fork until they are mostly smooth. A few small lumps are perfectly fine and add to the texture. You should have about 1 cup of mashed banana.
- Combine Wet Ingredients: To the mashed bananas, add the nut butter, maple syrup (or honey), and vanilla extract. Stir well with a spatula or wooden spoon until everything is thoroughly combined and smooth.
- Combine Dry Ingredients: In a separate medium bowl, whisk together the rolled oats, shredded coconut, ground cinnamon (if using), and salt. This ensures the dry ingredients are evenly distributed.
- Mix Wet and Dry: Gradually add the dry ingredient mixture to the wet ingredient mixture. Stir until everything is just combined. Be careful not to overmix, as this can make the bars tough. The mixture will be thick and sticky.
- Fold in Add-ins (Optional): If you’re using chocolate chips, chopped nuts, seeds, or dried fruit, gently fold them into the mixture now.
- Press into Pan: Transfer the mixture to the prepared baking pan. Using the back of a spoon, your clean hands (lightly dampened if the mixture is too sticky), or another piece of parchment paper on top, press the mixture firmly and evenly into the pan. The firmer you press, the better the bars will hold together. Ensure the surface is as level as possible.
- Chill to Set: Cover the pan with plastic wrap or foil and refrigerate for at least 2 hours, or preferably 4 hours, or even overnight. Chilling is crucial as it allows the bars to firm up and makes them easier to cut. For a quicker set, you can place them in the freezer for about 30-60 minutes.
- Cut and Serve: Once the bars are firm, use the parchment paper overhang to lift them out of the pan and onto a cutting board. Using a sharp knife, cut them into your desired size – typically 12 to 16 squares or rectangles.
- Store: Store the Coconut Banana Energy Bars in an airtight container in the refrigerator for up to one week, or in the freezer for up to 3 months (see FAQ for freezing tips).
Nutrition Facts
- Servings: Recipe yields approximately 12-16 bars, depending on how you cut them.
- Calories per serving (approx. for 1 of 16 bars): 150-180 calories (This can vary based on nut butter choice and optional add-ins).
- Source of Fiber: Primarily from the rolled oats and bananas, aiding digestion and promoting satiety.
- Healthy Fats: Contributed by the nut butter and coconut, providing sustained energy and supporting overall health.
- Natural Sugars: Primarily from bananas and a touch from maple syrup/honey, offering a more wholesome sweetness compared to refined sugars.
- Potassium: Bananas are a good source of potassium, important for heart health and muscle function.
- Complex Carbohydrates: The rolled oats provide complex carbs for slow-release energy, making these bars great for endurance.
Preparation Time
- Active Preparation Time: Approximately 15-20 minutes. This includes gathering ingredients, mashing bananas, mixing, and pressing the mixture into the pan.
- Chilling Time: Minimum 2 hours, preferably 4 hours or overnight. This is essential for the bars to set properly and achieve the desired chewy texture, making them easy to cut without crumbling.
How to Serve
These Coconut Banana Energy Bars are incredibly versatile! Here are some fantastic ways to enjoy them:
- As a Quick Breakfast:
- Grab one on your way out the door for a speedy, nutritious start to your day.
- Crumble a bar over a bowl of Greek yogurt or a smoothie bowl for added texture and flavor.
- Enjoy alongside a piece of fruit and a cup of coffee or tea for a more complete breakfast.
- Pre-Workout Fuel:
- Eat a bar about 30-60 minutes before your workout for a sustained energy boost without weighing you down.
- The combination of natural sugars and complex carbs makes them ideal for powering through exercise.
- Post-Workout Recovery:
- Consume within an hour after exercise to help replenish glycogen stores and provide some protein for muscle repair (especially if using a higher-protein nut butter).
- Healthy Afternoon Snack:
- Beat the 3 PM slump with a bar and a glass of water or herbal tea. It’s a much healthier alternative to sugary snacks or vending machine fare.
- Kids’ Lunchbox Treat:
- Cut into smaller, kid-friendly sizes. They’re a hit with children and provide good energy for their school day.
- Ensure your child’s school is not nut-free if using nut butter; opt for sunflower seed butter in that case.
- Hiking or Travel Snack:
- Pack them for hikes, road trips, or flights. They are portable, don’t require refrigeration for short periods (though best kept cool), and provide convenient energy on the go.
- With a Hot Beverage:
- Enjoy a bar as a delightful accompaniment to your morning coffee or evening tea. The flavors pair beautifully.
- Dessert Alternative:
- When you’re craving something sweet but want to keep it healthy, these bars can satisfy that craving, especially if you’ve added chocolate chips.
Additional Tips
- Toast Your Oats & Coconut: For an enhanced nutty flavor and slightly crispier texture, spread the rolled oats and shredded coconut on a baking sheet and toast in a preheated oven at 350°F (175°C) for 5-8 minutes, or until lightly golden and fragrant. Let them cool completely before adding to the mixture.
- Ingredient Swaps & Customization: Don’t be afraid to get creative!
- Spices: Add a pinch of nutmeg, cardamom, or allspice along with cinnamon.
- Extracts: Try almond extract instead of, or in addition to, vanilla for a different flavor profile.
- Citrus Zest: A teaspoon of orange or lemon zest can brighten up the flavors.
- Making them Nut-Free: If you have nut allergies, simply substitute the nut butter with sunflower seed butter (SunButter) or tahini. Ensure any add-ins like chocolate chips are also nut-free.
- Chocolate Lover’s Dream: For an extra decadent treat, drizzle melted dark chocolate over the top of the bars after they’ve set and before cutting. Or, mix in a tablespoon or two of unsweetened cocoa powder into the dry ingredients for a chocolate-banana flavor.
- Perfectly Sized Portions: For uniformly sized bars, after pressing the mixture into the pan, score the top with a knife before chilling. This makes them easier to cut cleanly once set. You can also use a ruler for precise measurements.
- Achieving the Right Texture: The firmness of your bars depends heavily on how well you press the mixture into the pan and how long they chill. If your bars are too crumbly, they might not have been pressed firmly enough, or the ratio of wet to dry ingredients might be slightly off (e.g., smaller bananas). Next time, add a tablespoon more nut butter or mashed banana.
- Extra Flavor Boosts: Consider adding a tablespoon of chia seeds or ground flaxseed for an omega-3 and fiber boost. They also help with binding. A pinch of espresso powder can subtly deepen the chocolatey notes if you’re using chocolate chips.
- Vary the Sweetness: The ripeness of your bananas significantly impacts the sweetness. Taste the wet mixture before adding the dry ingredients. If it’s not sweet enough for your liking, add a little more maple syrup or honey. Conversely, if your bananas are very ripe, you might be able to reduce the added sweetener.
FAQ Section
Q1: Are these Coconut Banana Energy Bars actually healthy?
A1: Yes, they are generally considered a healthy snack option. They are made with whole food ingredients like rolled oats (fiber, complex carbs), bananas (potassium, natural sugars), nut butter (healthy fats, protein), and coconut. They provide sustained energy and are free from artificial preservatives, colors, and excessive refined sugars often found in store-bought bars. However, they are calorie-dense, so portion control is key, especially if you’re watching your calorie intake.
Q2: Can I make these energy bars vegan?
A2: Absolutely! To make them vegan, simply ensure you use maple syrup instead of honey as your liquid sweetener. Also, double-check that your optional add-ins, like chocolate chips, are dairy-free and vegan-certified. The rest of the core ingredients are typically plant-based.
Q3: Can I make these Coconut Banana Energy Bars gluten-free?
A3: Yes, making them gluten-free is easy. The main ingredient to watch is the rolled oats. While oats are naturally gluten-free, they are often processed in facilities that also handle wheat, barley, and rye, leading to cross-contamination. To ensure they are truly gluten-free, purchase certified gluten-free rolled oats. All other standard ingredients in this recipe are typically gluten-free, but always check labels if you have celiac disease or severe gluten sensitivity.
Q4: How long do these homemade energy bars last, and how should I store them?
A4: These bars should be stored in an airtight container in the refrigerator. They will keep well for up to one week. Due to the fresh banana content, they are not ideal for storing at room temperature for extended periods. For longer storage, you can freeze them.
Q5: Can I freeze these Coconut Banana Energy Bars?
A5: Yes, they freeze beautifully! After cutting the bars, you can wrap them individually in plastic wrap or parchment paper, then place them in a freezer-safe bag or container. They can be frozen for up to 3 months. To serve, thaw them in the refrigerator or at room temperature for a short while. Freezing is a great way to have a quick snack ready anytime.
Q6: My bars are too crumbly. What did I do wrong?
A6: Crumbliness usually stems from a few potential issues:
* Not enough binder: Your bananas might have been on the smaller side, or you might need a touch more nut butter or liquid sweetener.
* Not pressed firmly enough: You need to compress the mixture very tightly into the pan. This helps all the ingredients meld and stick together.
* Not chilled long enough: Chilling is crucial for the bars to set properly. Ensure they’ve had at least 2 hours, preferably longer.
* Cutting too soon: If they aren’t fully chilled, they’ll crumble when cut.
Next time, try adding an extra tablespoon of mashed banana or nut butter if your mixture seems too dry, and really pack it down in the pan.
Q7: Can I add protein powder to this recipe for an extra protein boost?
A7: Yes, you can add protein powder, but it might alter the texture and liquid balance. Start by adding 1-2 tablespoons of your preferred protein powder (whey, casein, or plant-based) to the dry ingredients. You may need to compensate by adding a little extra liquid – perhaps another tablespoon of mashed banana, nut butter, or a splash of milk (dairy or non-dairy) – if the mixture becomes too dry. Taste and adjust as needed.
Q8: Are these energy bars suitable for kids?
A8: Definitely! These Coconut Banana Energy Bars are a fantastic snack for kids. They are made with wholesome ingredients and provide natural energy. You can cut them into smaller, bite-sized pieces for little hands. If your child attends a nut-free school or has nut allergies, remember to use sunflower seed butter instead of nut butter and ensure all other add-ins are nut-free. They’re a much healthier alternative to many processed kids’ snacks.